Journeys Page
Journeys are the primary way of making use of Zero-Shared Data and collecting Zero-Party Data. They pull together everything that the DataSapien platform offers to orchestrate personalised experiences and desired business outcomes for both customers and your organisation.
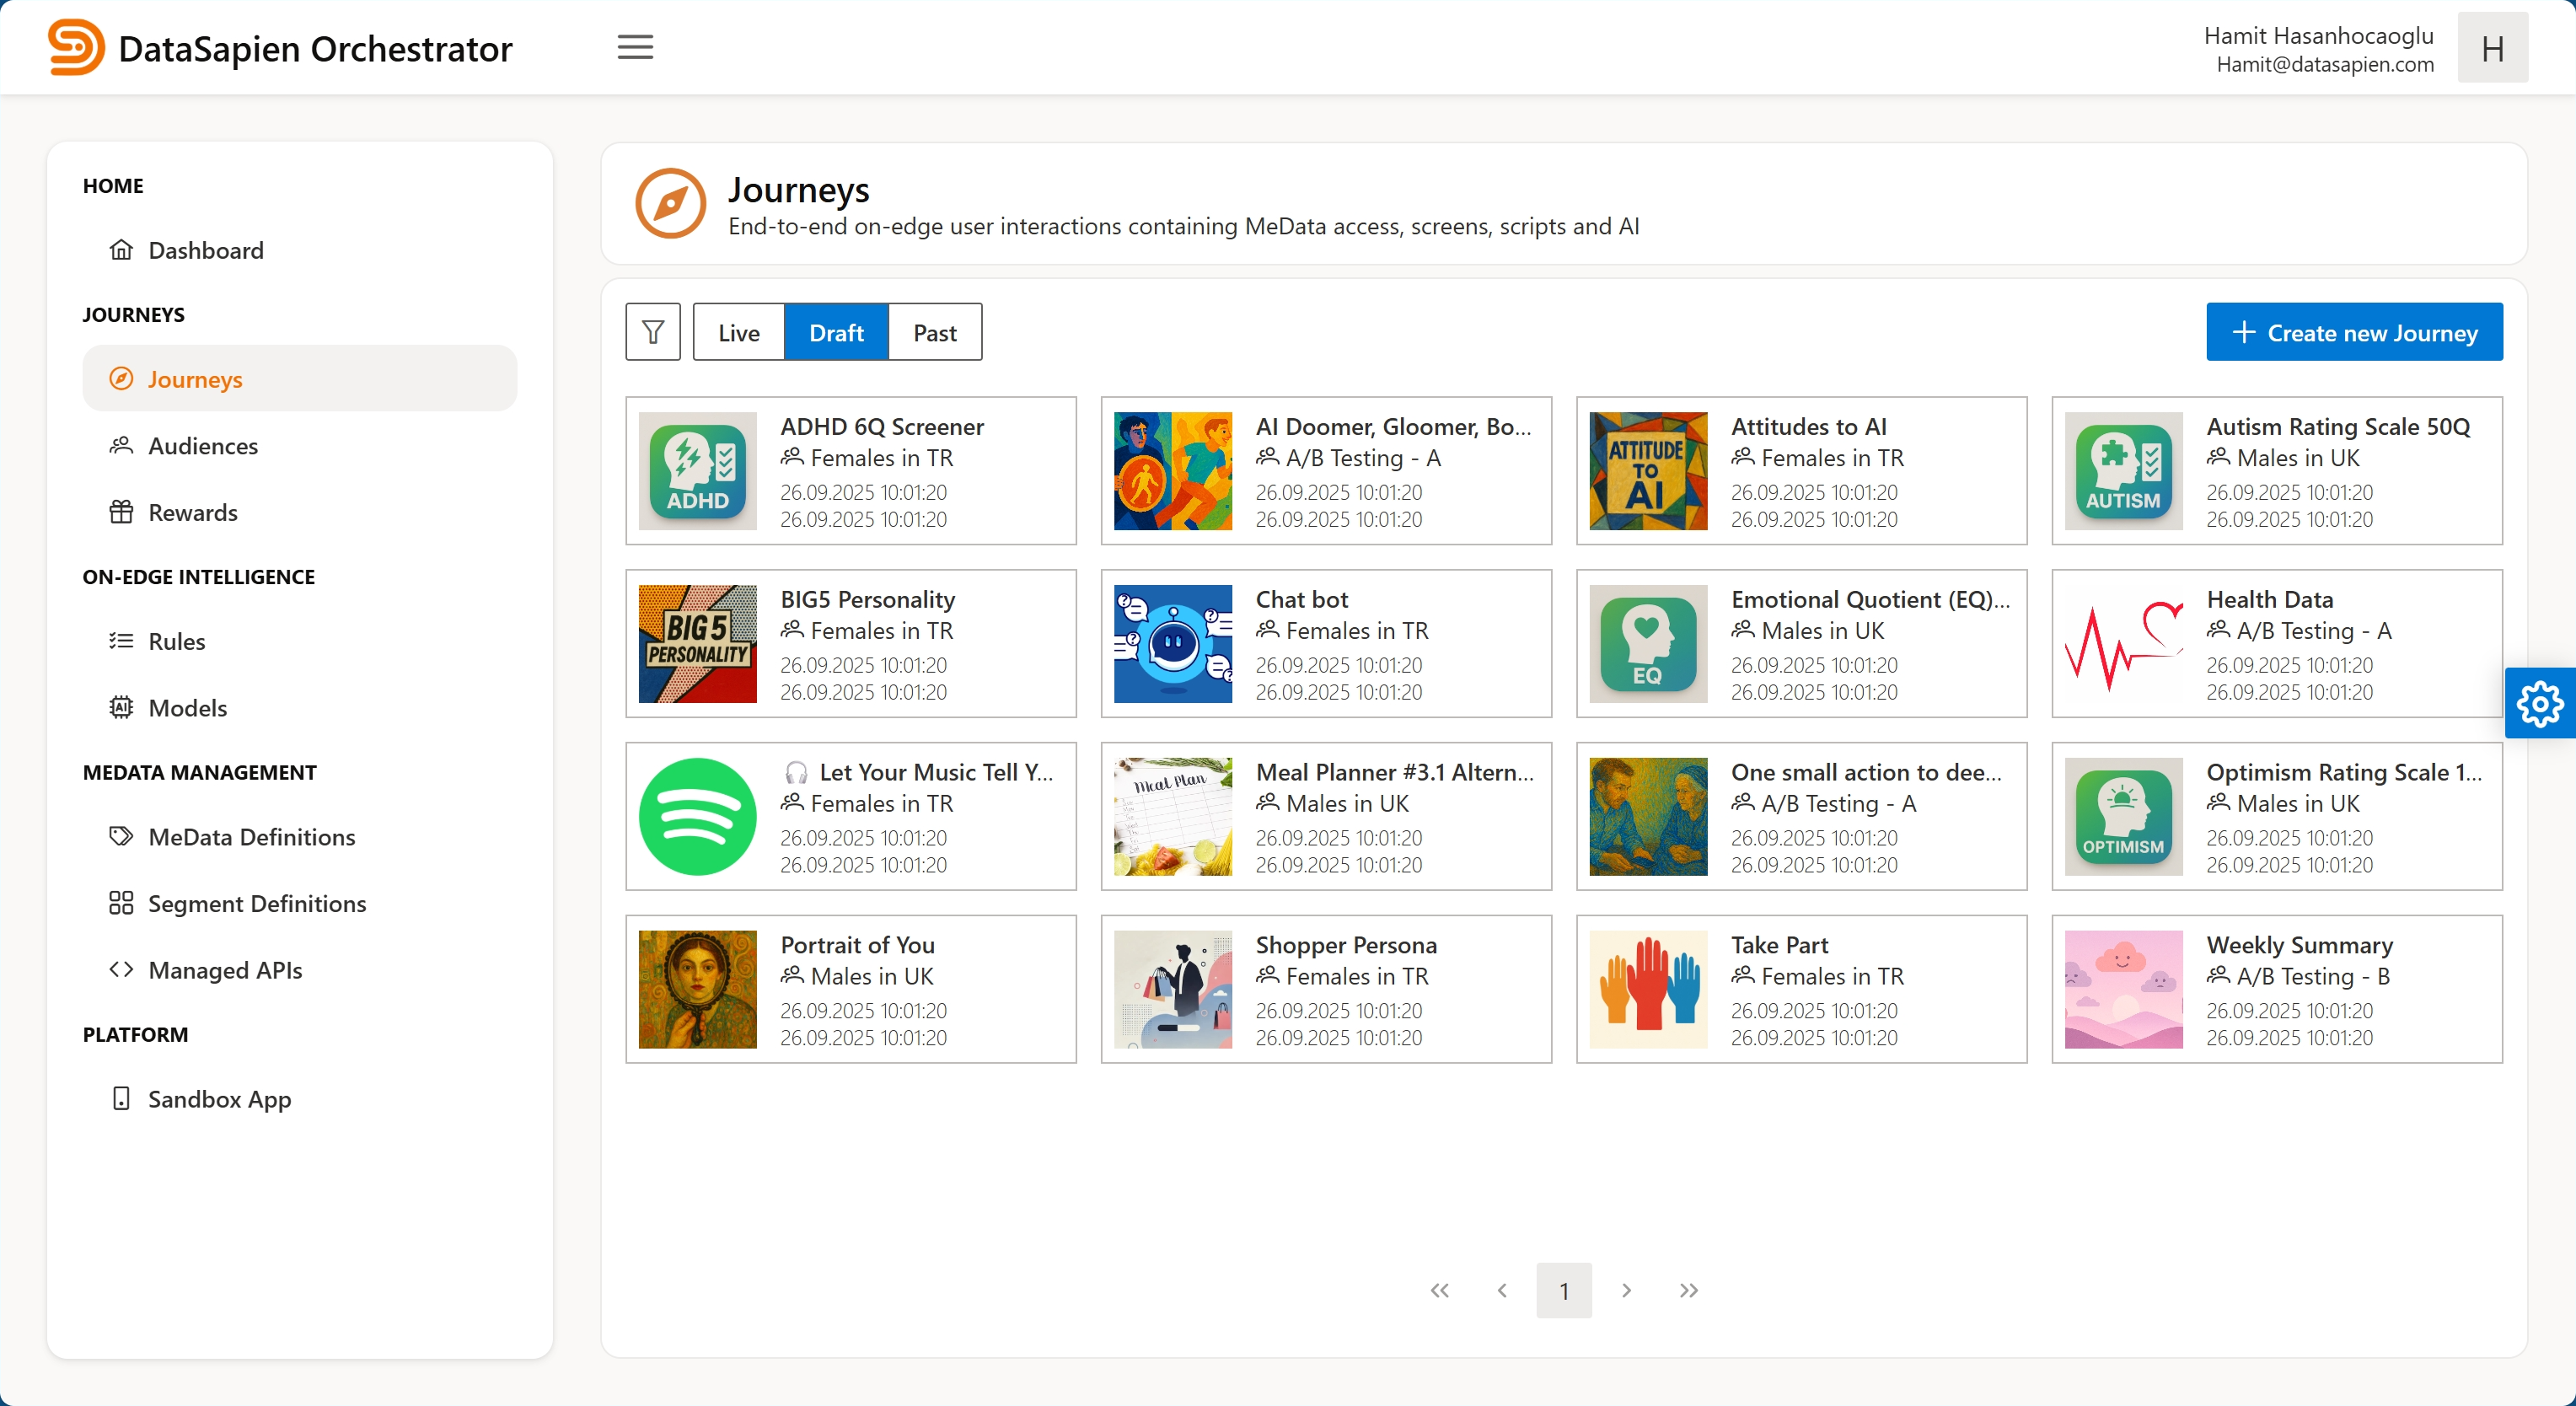
The Journeys page groups Journeys based on their status:
- Live tab displays the Journeys that were published and still live. You will go to viewer when you click on a Journey in this tab.
- Draft tab displays the Journeys that were created but not published yet. You will go to editor when you click on a Journey in this tab.
- Past tab displays the Journeys that were completed and no longer live. You will go to viewer when you click on a Journey in this tab.
Journeys page
Journey Editor
The Orchestrator includes a powerful, visual Journey Editor that lets you design and deploy your Journeys. You can request the data collected / processed be sent to the Orchestrator. This is what makes consented Zero-Party Data (ZPD) accessible to you.
The Journey editor contains following sections:
- Basics and Audience: In this section, you specify the title, description, and visuals for your Journey that will be presented to the user. You also specify the Tags and the target Audience.
- Journey Flow: In this section, you design the flow of your Journey step by step.
- Reward: In this section, you determine whether this Journey will grant Rewards to those who complete it and provide the Zero-Party Data, if any is requested.
- Request Data and Publish: In this section, you select which data is to be sent back as Zero-Party Data. You can see a summary of the Journey and publish it.
You can save your progress as a draft if you wish to finish creating your Journey later.

Journey Editor Sections
Tags
Tags are used by your mobile application to filter Journeys and "place" them in your host application as you see fit. You can add multiple tags to your Journeys.
For instance, you may add a home tag to some of your Journeys and your application can query those to display them in a list on its home screen. Similarly, you can have a banner tag, and your application can display them in its top banner.
Use Tags to classify Journeys within your host mobile app.
Target Audience
All Journeys must target an Audience (All is an Audience provided out of the box to target all users). In this section you can select an existing Audience or create a new one.
In addition to the Audience, you can specify number of participants. You can either:
- Select
Open-ended- in this case, the Journey will always be available to the target Audience. - Select
Limitedand specify the maximum count - in this case, Journey will autocomplete when the desired number of participants is reached.
For A/B Testing you can use the A/B Testing - Group A and A/B Testing - Group B Audiences that are provided out of the box.
Flow Designer
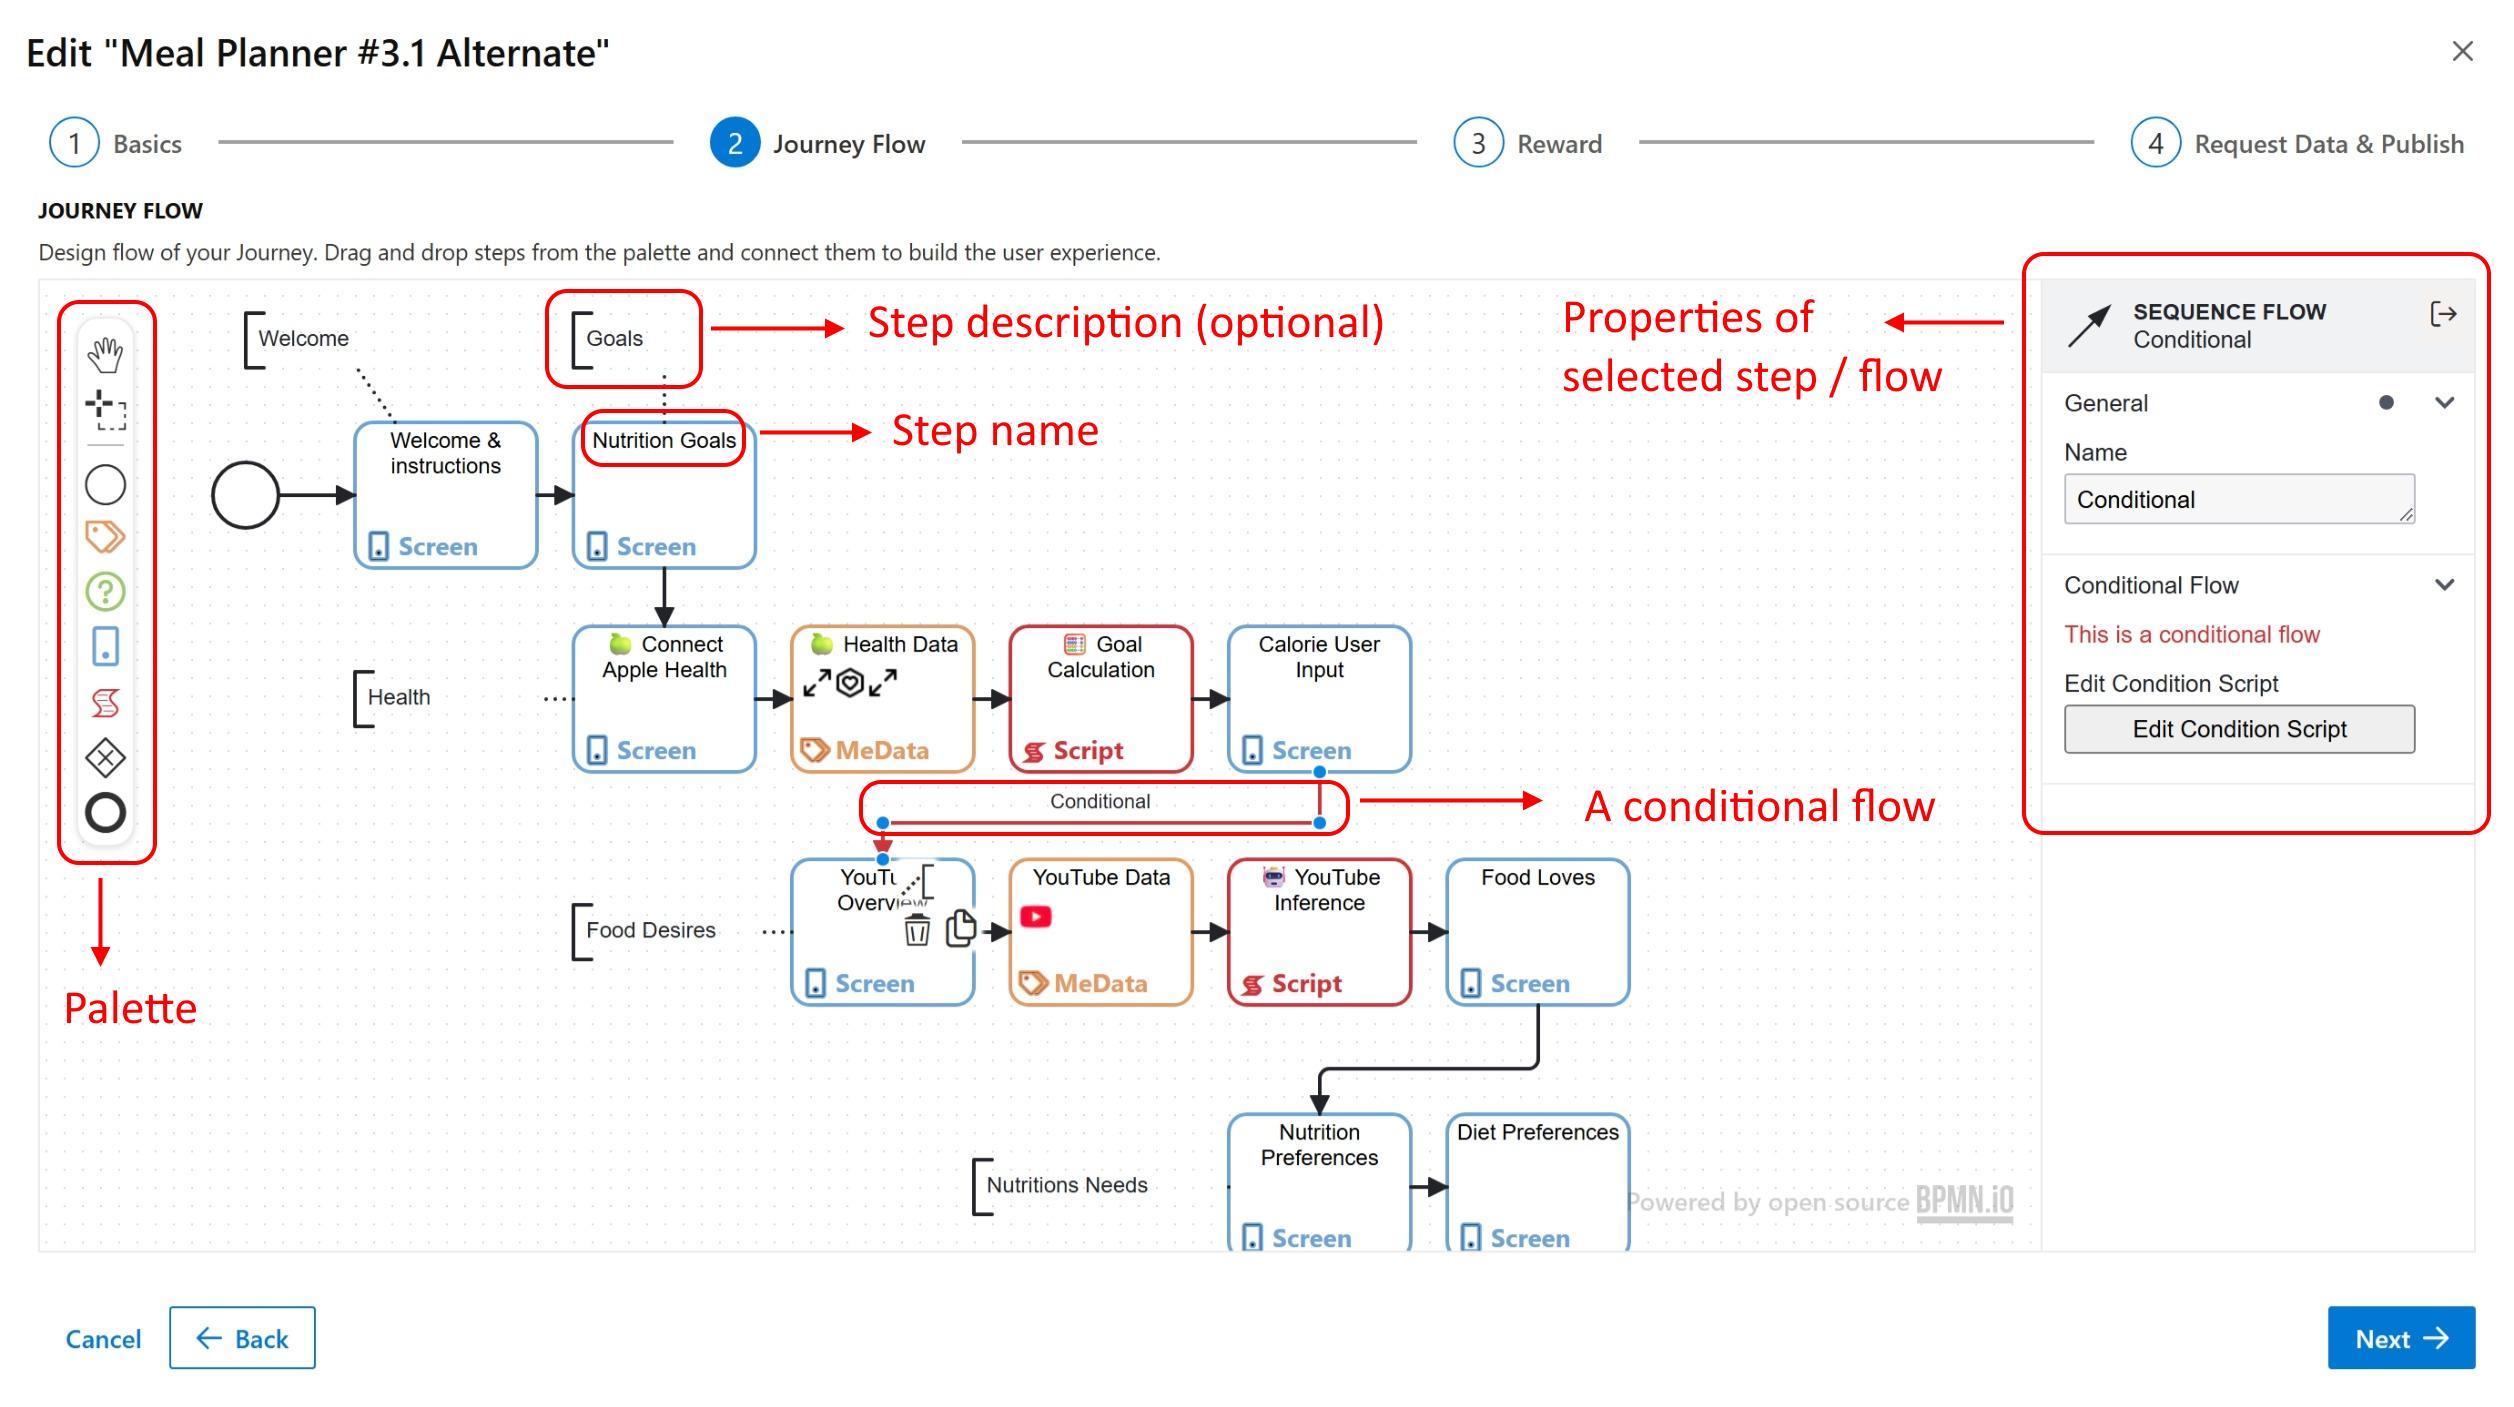
The Flow Designer is a drag and drop designer where you can add steps to the canvas and connect them with sequence flows. The Palette contains the step types that you can drag onto the canvas.
Journey Flow Designer
It is the JourneyContext that make the steps and sequence flows communicate. The data collected in the steps are put into the JourneyContext and both steps and sequence flows can make use of data that was created before them.
There are two types of sequence flows:
- Regular flows that just connect two steps.
- Conditional flows that contain a script which should return "true" or "false".
| Palette Icon | Element |
|---|---|
 | MeData Step Allows access to selected list of MeData in the Journey. When executed, this step will trigger MeData collection and native OS permission dialogs if needed. Collected MeData values will be put into the JourneyContext as a variable with the name of the MeData Definition available to following steps. Double click the step on the canvas to access the MeData Usage Editor and edit list of MeData. |
 | Screen Step Allows designing custom screens to collect input from users or to inform them. Screen components can make use of variables from the JourneyContext and collected input in the screen will be put into the JourneyContext as a variable with the name given to the input component. Double click the step on the canvas to access the Screen Designer. |
 | Question Step Allows creating a question-and-answer based UI quickly. This step is shortcut of creating a custom Screen Step to display a question and get an answser. Collected MeData values will be put into the JourneyContext as a variable. Double click the step on the canvas to access the Question Editor. |
 | Script Step Allows authoring and deploying custom logic. Scripts Steps can make use of variables available in the JourneyContext and put new ones into the JourneyContext. All Mobile SDK Services and Managed APIs are available to the scripts. Double click the step on the canvas to access the Script Editor. |
 | Start Step Where the Journey flow starts. |
 | End Step Where the Journey flow ends. |
MeData Usage Editor
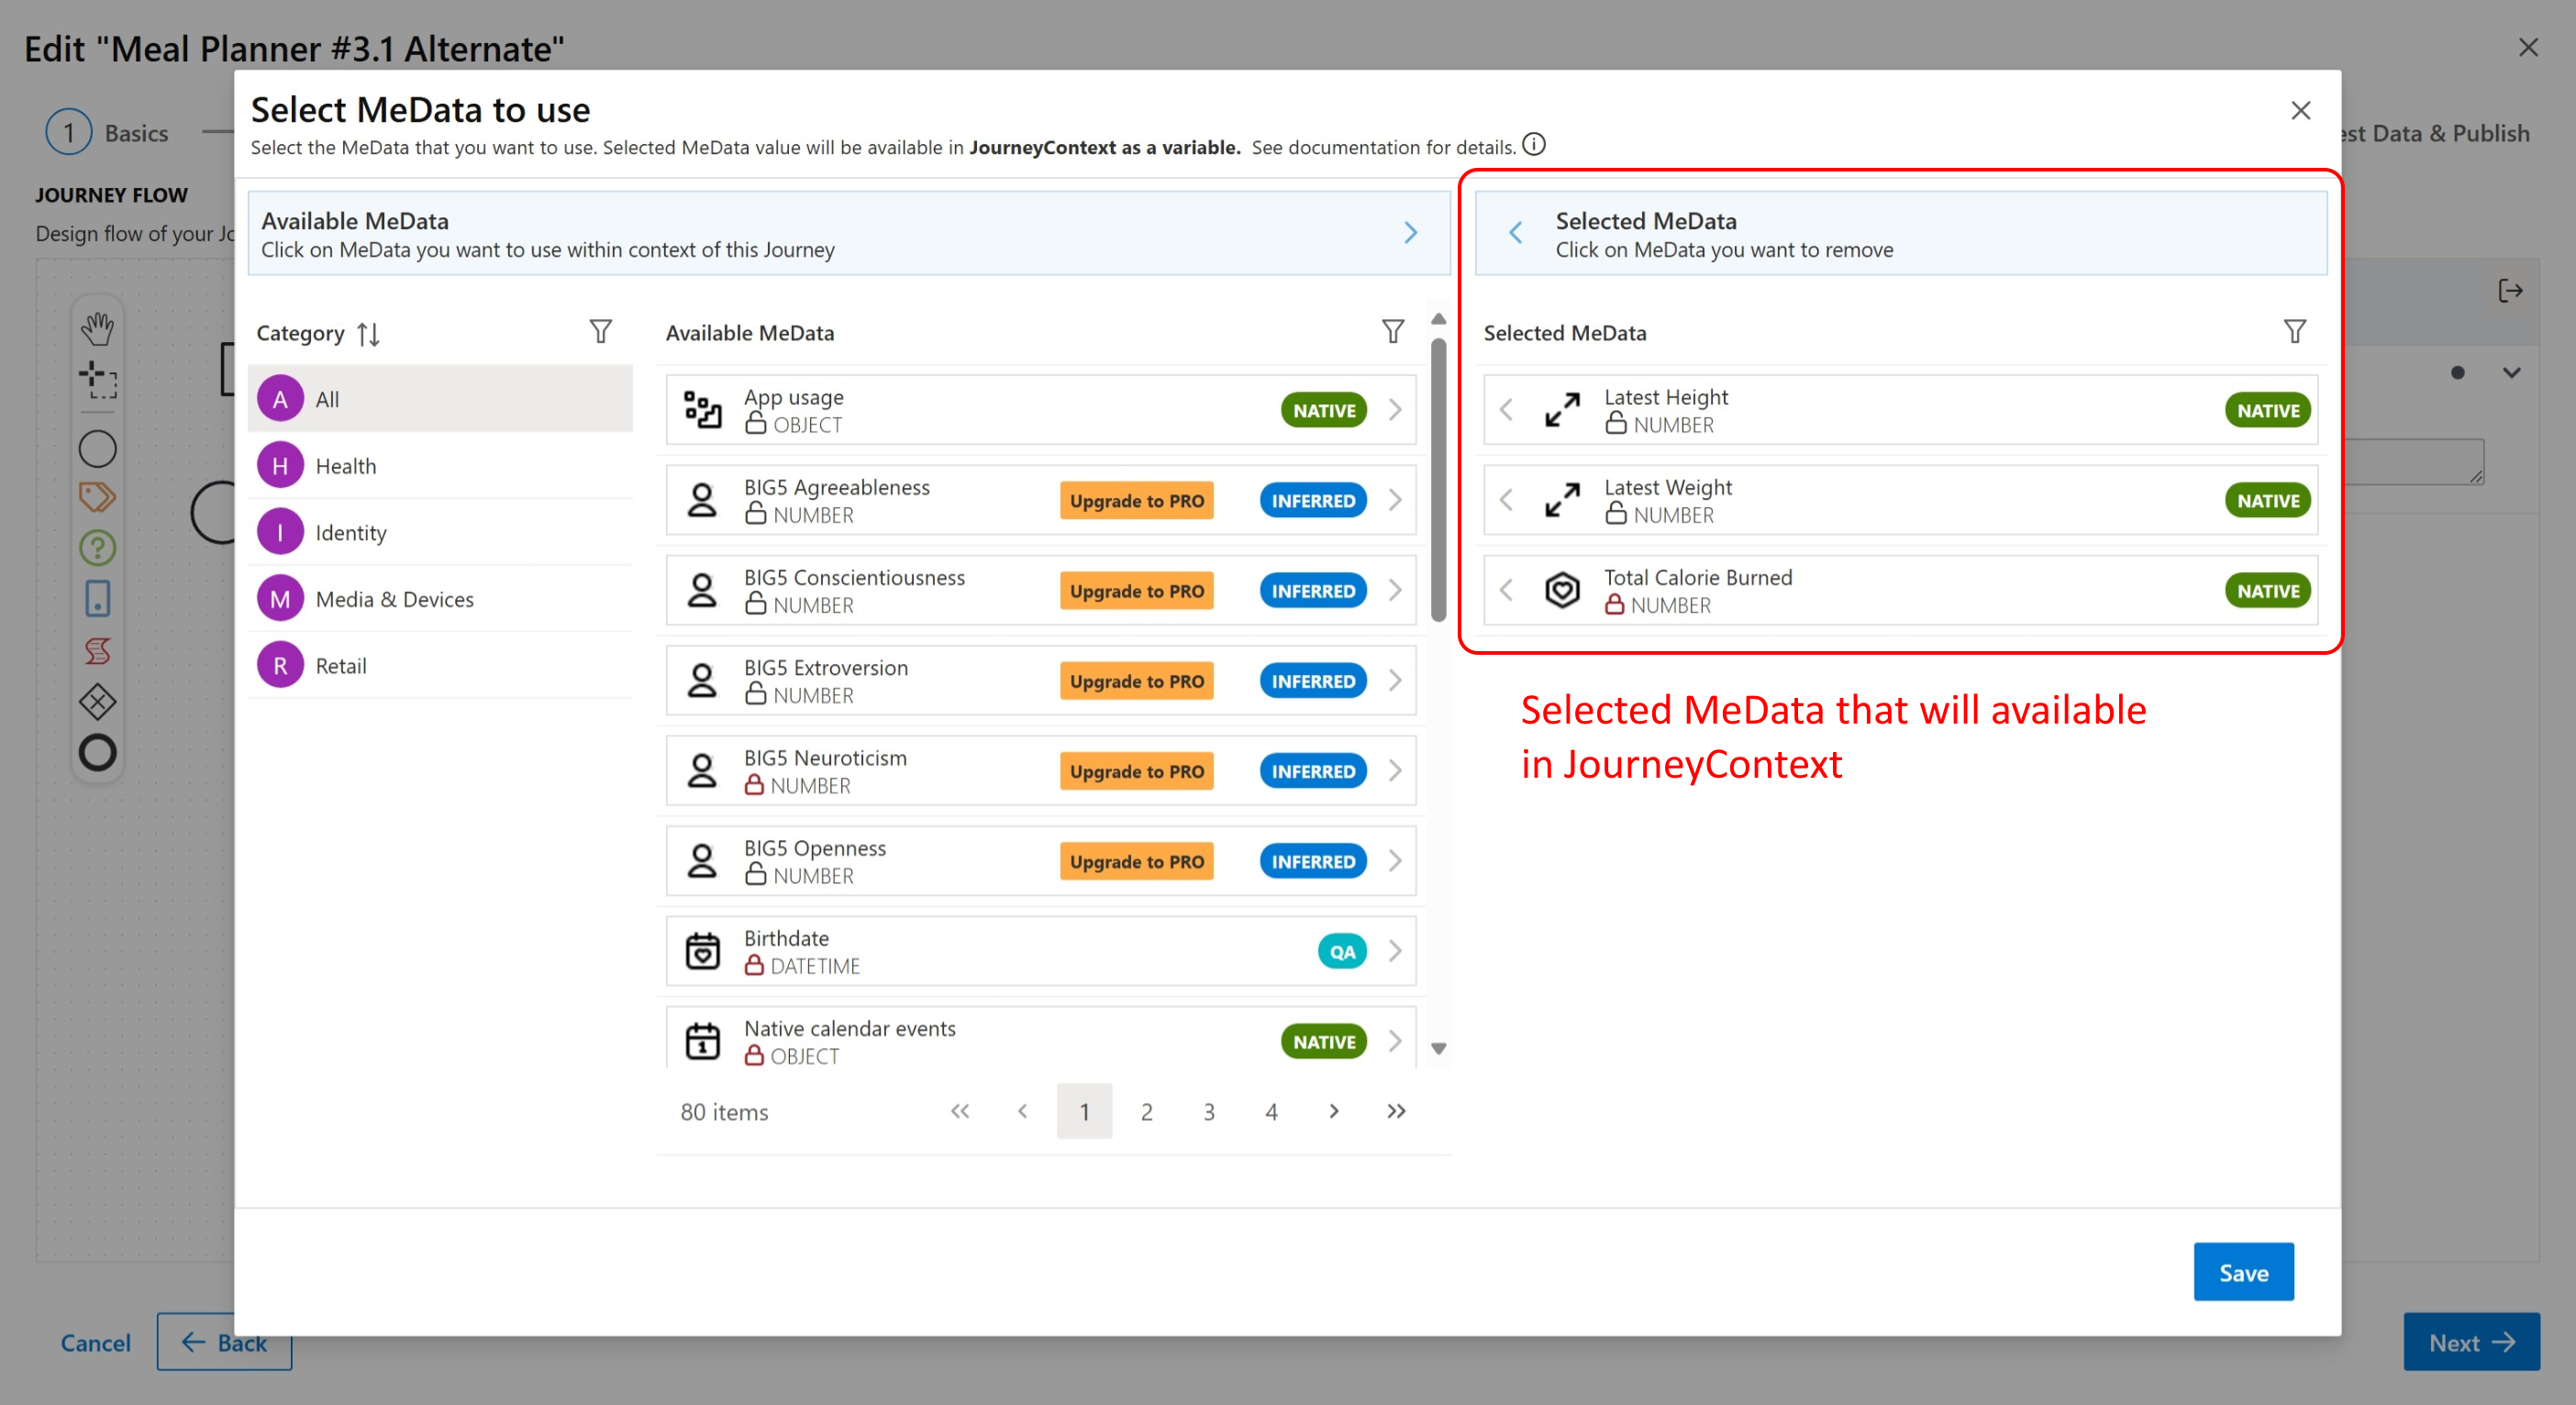
The MeData Usage Editor allows you to select the list of MeData you want to be available in the Journey. The Mobile SDK will take the required action based on the source of the MeData when executing the MeData Step.
- Native sourced MeData may trigger mobile OS level permission dialogs if the data requires it.
- Question sourced MeData will display a question-and-answer screen as if you placed a Question Step on the Journey flow.
- The related script will be executed for script sourced MeData.
Journey MeData Usage Editor
Value(s) of the MeData that you selected will be put into JourneyContext with programmatic name of the MeData as its key.
Screen Designer
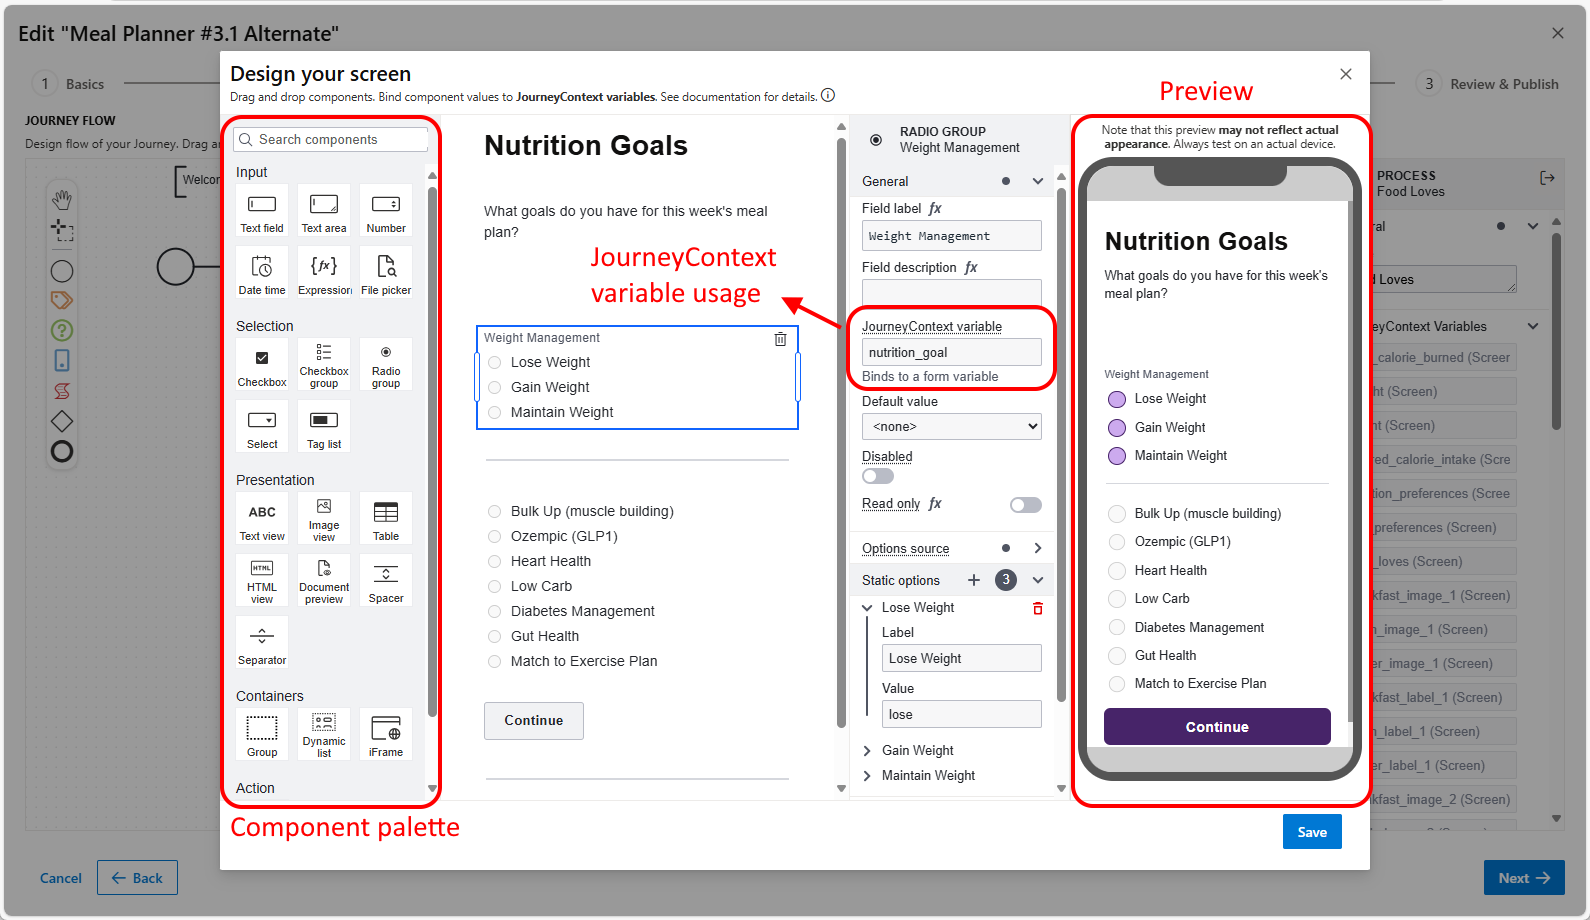
The Screen Designer enables you to create screens using common UI components. You can drag and drop UI components from the left hand side to the screen canvas in the middle. To the right of the screen canvas is the Component Properties panel where you can modify the component on the canvas. The Screen Designer displays a live preview of the screen on the most right hand side.
Journey Screen Designer
You can use JourneyContext variables in the UI components both as input and output:
- You can display JourneyContext variables in value, label and description fields of the components. Use
{{<JourneyContext_Variable_Name>}}syntax to embed value of the variable. Most of the components support markdown too. - Each input component has an associated
JourneyContext variable. Value of the input collected from user will be put into JourneyContext with this name.
Screen Designer allows styling designed screens so that they match your app's design system completely. You can style:
- Font
- Colors for background, text
- Border size, padding and margin values
- Border radius
Script Editor
The Script Editor lets you author scripts in JavaScript. You can make use of:
- The variables in the JourneyContext
- The DataSapien Mobile SDK services, eg
- MeDataService to read collected values for a MeData Definition, save a new value for a MeData Definition
- IntelligenceService to invoke provisioned ML / AI models
- A subset of standard JavaScript APIs including
fetchto consume external APIs via Managed APIs
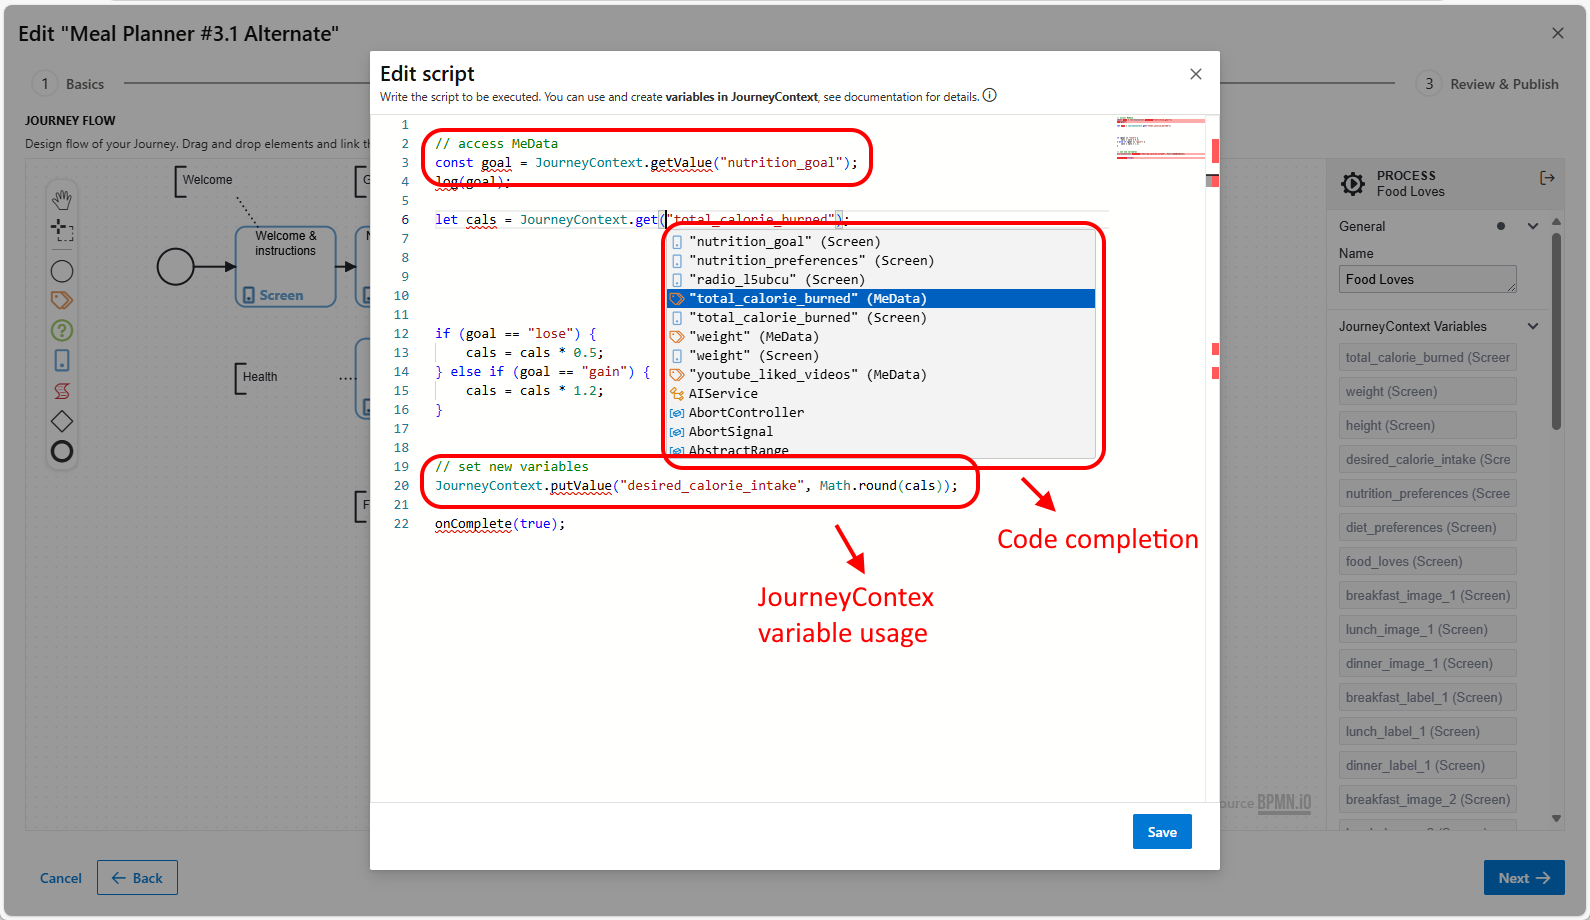
Script Editor
The Script Editor provides smart code completion for variables in the JourneyContext and the functions provided by the Mobile SDK Services.
Question Editor
The Question Editor lets you create a question and specify the acceptable answer(s) to it. Question Steps allow you to build survey-like interactions quickly.
- You can make the user pick from predefined choices or let them answer in free form. If you enable predefined choices, you need to provide predefined choices. Use plus / minus buttons to add remove predefined choices.
- You can make user the select a single choice / give a single answer or select multiple choices / give multiple answers.
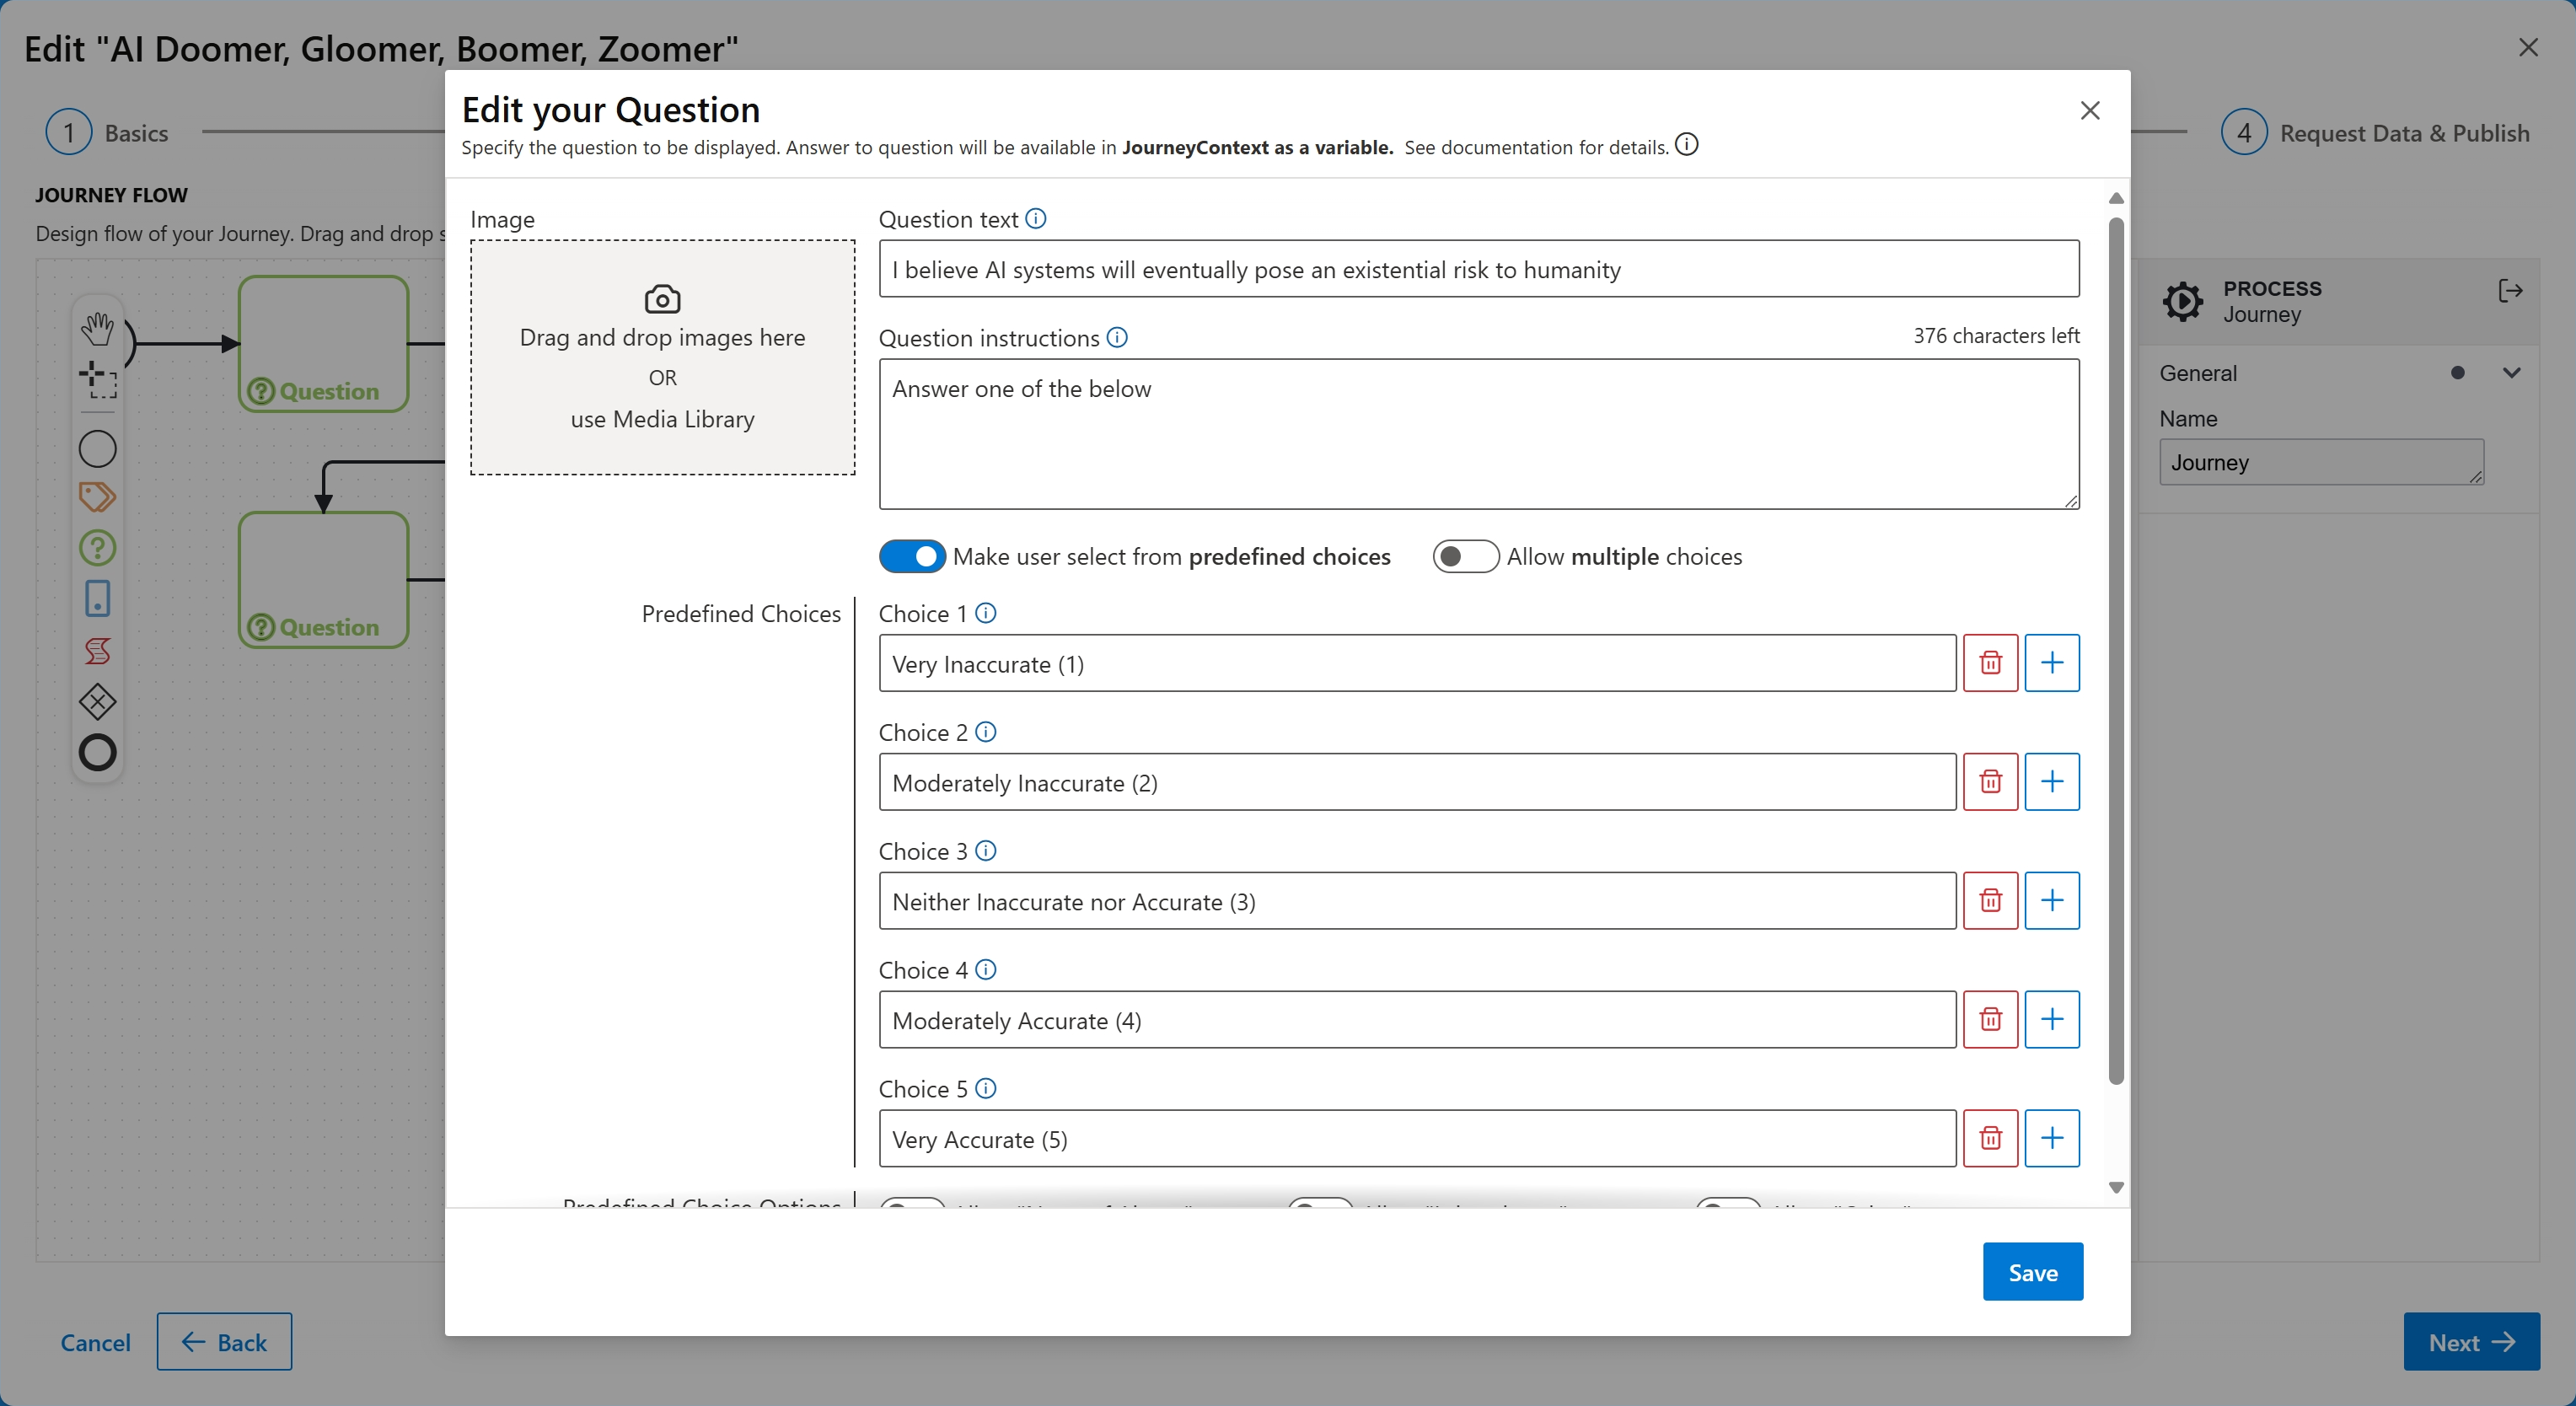
Question Editor
Conditional Flows
The Flow Designer allows you execute logic to choose between the next steps to be executed. In this way you are able to alter the execution of the Journey based on; user input after a Screen Step, answer after a Question Step or a calculated value after Script Step execution.
Scripts in conditinal flows make use of JourneyContext variables and return either "true" or "false" to indicate if this sequence should be followed. If there are multiple sequence flows leaving a step; you must make sure that all of them are conditional. Mobile SDK will evaluate the condition script in no particular order and pick the first one returning "true".
Requesting Zero-Party Data
In the last section, the Journey editor displays the list of data that will be collected and processed on-device during the Journey execution. You will be presented with the variables in the JourneyContext contributed by different step types.

Zero-Party Data Request
- The MeData panel displays all of the MeData collected from all of the MeData Steps combined. Note that non sharable MeData can not be selected and a lock icon is displayed next to it
- The Screen Input panel displays the input to the components from all of the Screen Steps combined
- The Calculated panel displays the variables that all Script Steps put into the context
- The Answer panel displays answer to the questions from all of the Question Steps combined
Select the ones you want Mobile SDK to submit at the end of the Journey execution. The submitted Zero-Party data will be stored in JSON files, from where they can be picked up for further processing.
Raw JSON files containing submitted Zero-Party Data can be fetched and processed by your systems further. Contact us to get programmatic access to JSON files.
Journey Viewer
Journey viewer consists of header and content sections. The header section displays:
- Name, Audience and publish date of the Journey
- Status of the Journey (either
LiveorPast) - When it was published and whe it was completed (if Journey is in
Paststatus) - Number of participants (submissions)
- Number of days that the Journey stated in
Livestatus before being completed
The content section displays Zero-Party Data view if any was requested for the Journey.
Zero-Party Data View
If the Journey contains data request the Mobile SDK submits requested data at the end of the Journey execution. For such Journeys the viewer displays following:
- The Basic View tab contains basic aggregation performed on submitted data.
- The Grid View tab contains a powerfull pivot view that can perform reporting on submitted data. You can arrange the data in groups of rows and columns and use aggregations on the data values such as sum / min / max / avg.
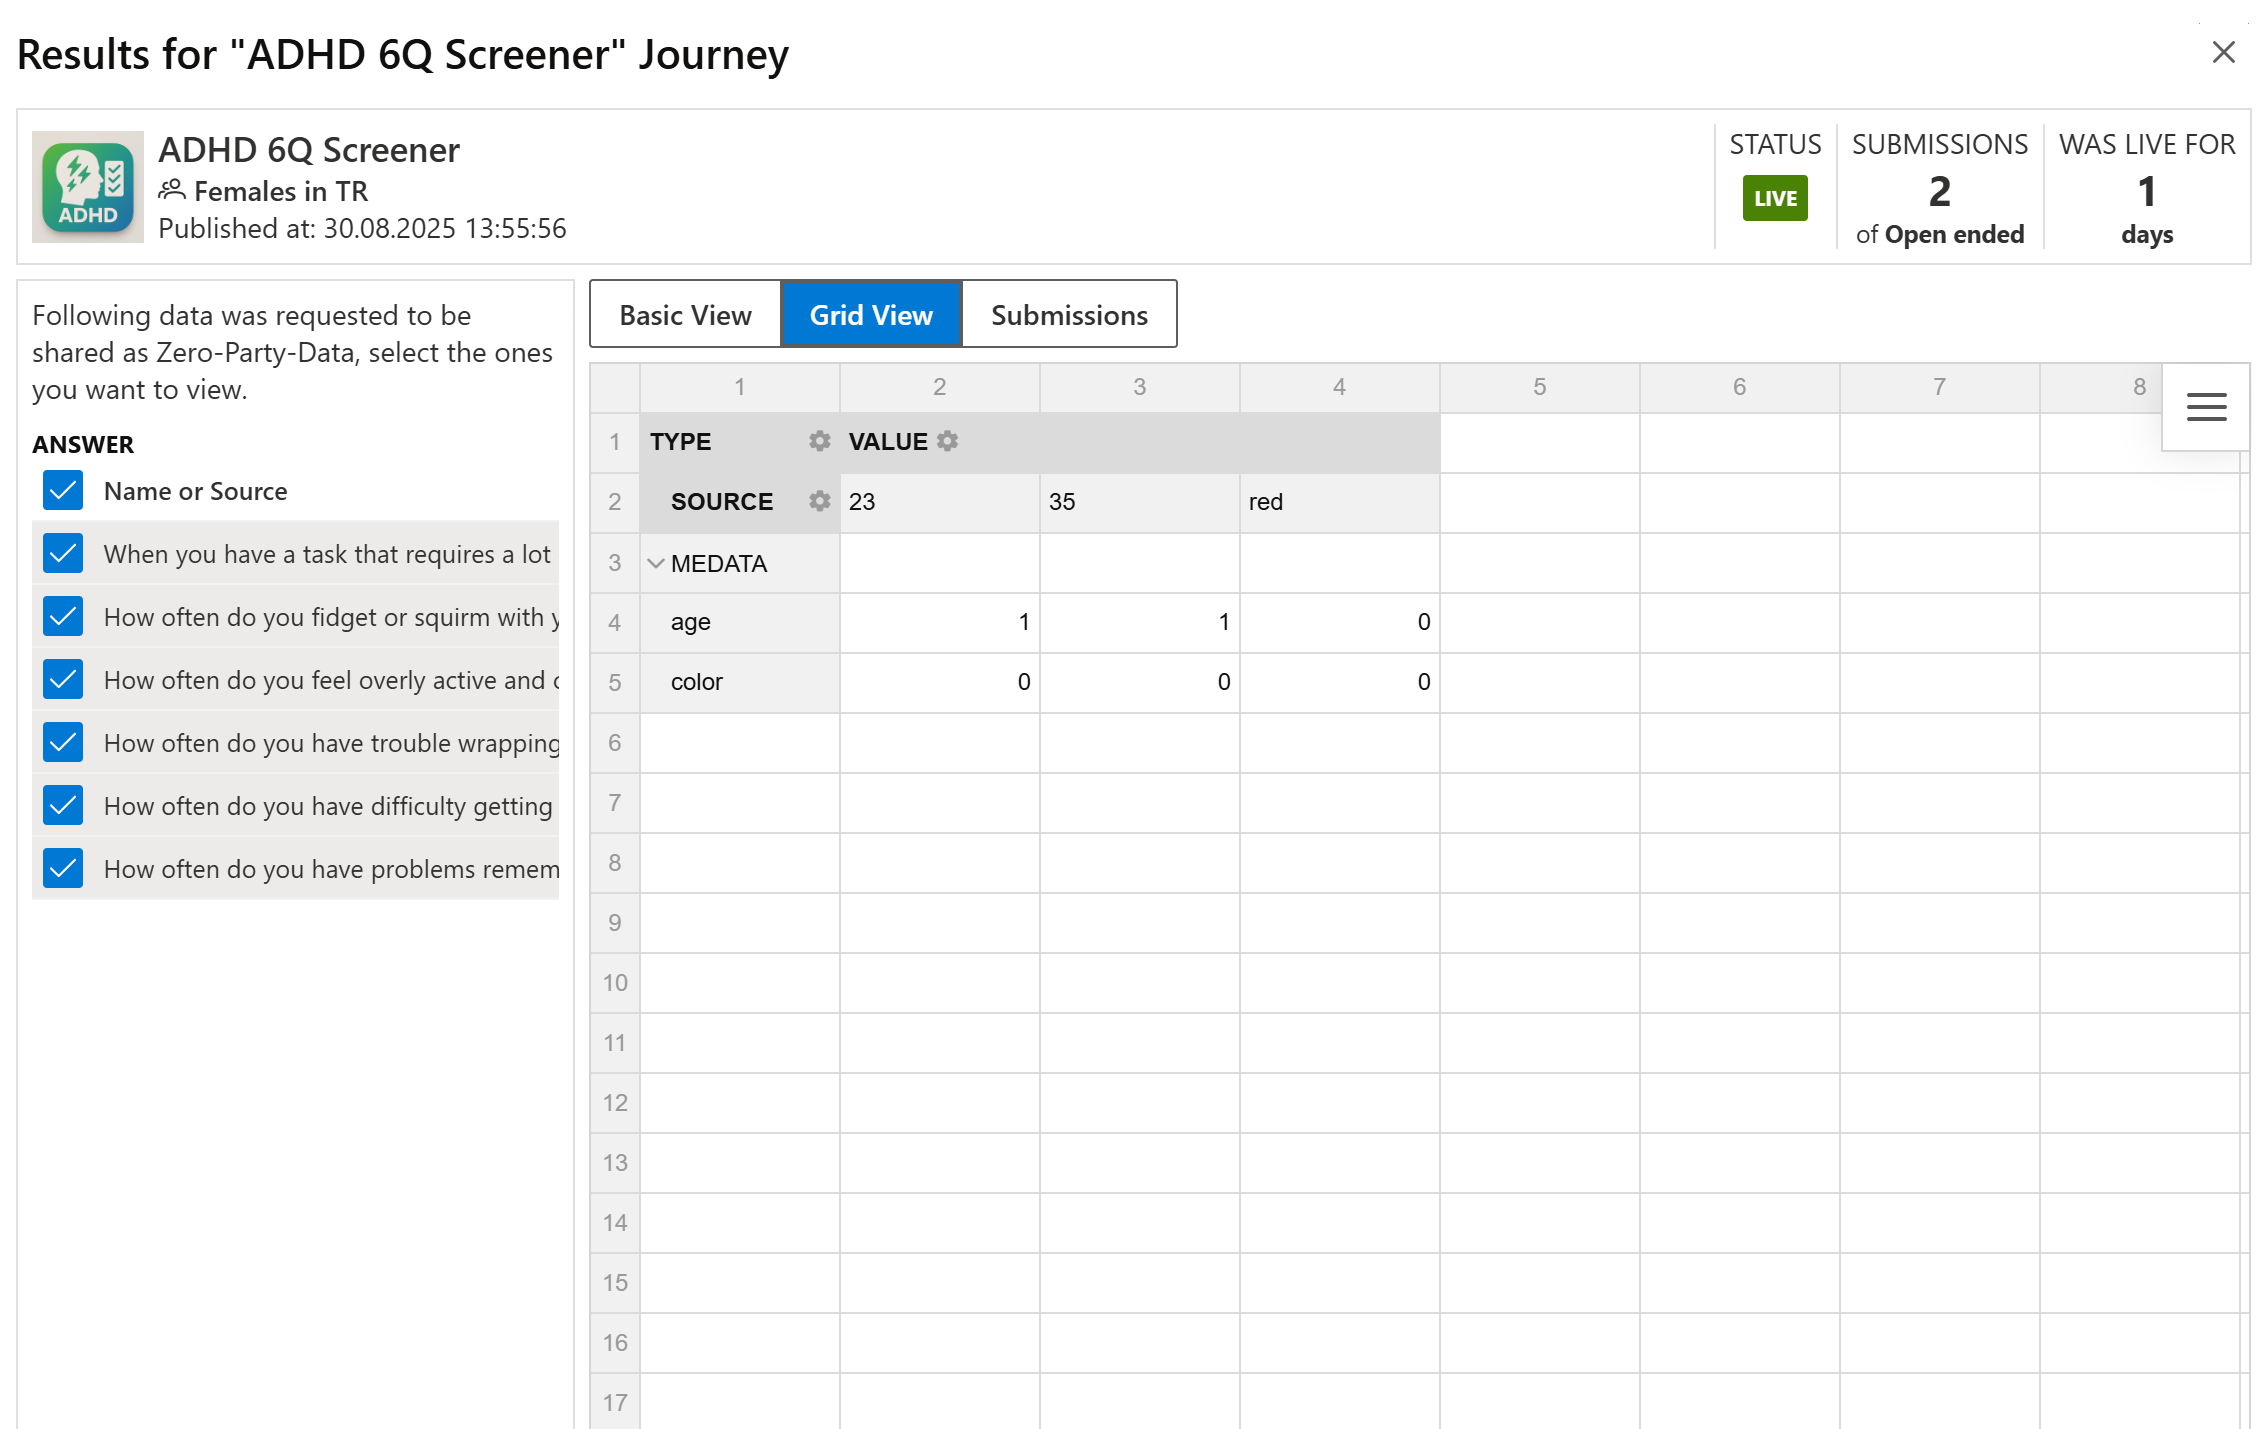
Zero-Party Data Pivot View