Hello World Journey
This guide walks you through building your very first DataSapien Journey end to end — from initialising the Mobile SDK in your app, to designing the Journey on the Orchestrator, to running it on a device.
By the end you will have a working "Hello, World" Journey that:
- Collects a piece of MeData (the user's favourite colour) on the device.
- Asks the user their name in a Question step.
- Composes a personalised greeting in a Script step.
- Displays the greeting on a Screen step.
The flow you'll build:
┌───────┐   ┌────────────────┐   ┌────────────────┐   ┌────────────┐   ┌──────────────────┐   ┌─────┐
│ Start │ → │     MeData     │ → │    Question    │ → │   Script   │ → │      Screen      │ → │ End │
└───────┘   └────────────────┘   └────────────────┘   └────────────┘   └──────────────────┘   └─────┘
              favorite_color       user_name            greeting        displays {{greeting}}
| Step | What it does | JourneyContext after |
|---|---|---|
MeData | Asks "What is your favourite colour?" (the question on the favorite_color MeData) and stores the answer in the on-device data vault. | favorite_color |
Question | Asks "What's your name?" — answer kept only in the JourneyContext, not persisted as MeData. | + user_name |
Script | Reads favorite_color and user_name, builds a greeting string, writes it back. | + greeting |
Screen | Renders a Text component bound to {{greeting}}. | (unchanged) |
Prerequisites
Before you start, make sure you have:
- An Orchestrator account and a set of configuration keys (auth URL, client ID, client secret, host URL, media URL). These are provided after registration — contact us if you do not have them yet.
- A mobile app project to embed the SDK into. You can use any existing app, or a fresh empty one. Detailed install guides per platform: iOS, Android, Flutter, React Native.
- Access to the Orchestrator web UI in your browser.
- About 30 minutes.
Concepts you'll meet
You'll touch a handful of concepts in this guide. Each one is explained briefly inline and linked to its full reference page:
- MeData — a piece of personal data collected and stored on-device.
- MeData Definition — the schema describing a MeData (its source, value type, etc.).
- Journey — a designed flow that orchestrates screens, data collection and logic on-device.
- Step — a single node in a Journey flow (MeData, Screen, Question, Script, Start, End).
- JourneyContext — the per-execution variable bag steps read from and write to.
- Audience — the target user group for a Journey. We'll use the built-in All Audience.
Step 1: Add and initialise the SDK
The DataSapien Mobile SDK is what runs Journeys, stores MeData on-device and talks to the Mobile Backend. You add it to your app once and initialise it on every app launch.
There is a full installation guide for each platform — they cover dependencies, manifests/Info.plist, OAuth redirect setup and capabilities. Pick yours:
- iOS
- Android
- Flutter
- React Native
Follow the full guide: Install the SDK on iOS.
The minimum to initialise the SDK looks like:
import DataSapien

let config = DataSapienConfig
    .Builder()
    .setAuth(
        url: "<YOUR_AUTH_URL>",
        clientId: "<YOUR_CLIENT_ID>",
        clientSecret: "<YOUR_CLIENT_SECRET>",
        scope: "<YOUR_AUTH_SCOPE>"
    )
    .setHost(
        baseUrl: "<YOUR_HOST_URL>",
        mediaUrl: "<YOUR_MEDIA_URL>"
    )
    .setdebug(true)
    .build()

DataSapien.initialize(dataSapienConfig: config)
DataSapien.setup { result in
    switch result {
    case .success: break    // SDK ready
    case .failure(let e):   print(e)
    }
}
Follow the full guide: Install the SDK on Android.
The minimum to initialise the SDK looks like:
val config = DataSapienConfig.Builder()
    .setAuth(
        authUrl = "<YOUR_AUTH_URL>",
        authClientId = "<YOUR_CLIENT_ID>",
        authScope = "<YOUR_AUTH_SCOPE>",
        authClientSecret = "<YOUR_CLIENT_SECRET>"
    )
    .setHostUrl("<YOUR_HOST_URL>")
    .setMediaUrl("<YOUR_MEDIA_URL>")
    .build()

DataSapien.initialize(this, config)

lifecycleScope.launch {
    DataSapien.setup(this@MainActivity)
        .onSuccess { /* SDK ready */ }
        .onFailure { /* handle */ }
}
Follow the full guide: Install the SDK in a Flutter app.
The minimum to initialise the SDK looks like:
import 'package:datasapien_sdk/datasapien_sdk.dart';

final config = DataSapienConfig.builder()
  .setAuth(
    authUrl: '<YOUR_AUTH_URL>',
    authClientId: '<YOUR_CLIENT_ID>',
    authClientSecret: '<YOUR_CLIENT_SECRET>',
    authScope: '<YOUR_AUTH_SCOPE>',
  )
  .setHostUrl('<YOUR_HOST_URL>')
  .setMediaUrl('<YOUR_MEDIA_URL>')
  .build();

await DataSapien.initialize(config);
await DataSapien.setup();
Follow the full guide: Install the SDK in a React Native app.
The minimum to initialise the SDK looks like:
import DataSapien from 'react-native-datasapien';

const config = {
  auth: {
    url: '<YOUR_AUTH_URL>',
    clientId: '<YOUR_CLIENT_ID>',
    clientSecret: '<YOUR_CLIENT_SECRET>',
    scope: '<YOUR_AUTH_SCOPE>',
  },
  host: { url: '<YOUR_HOST_URL>', mediaUrl: '<YOUR_MEDIA_URL>' },
  debug: true,
};

const ok = await DataSapien.initialize(config);
if (ok) await DataSapien.setup();
initialize() registers the configuration and prepares the SDK. setup() syncs MeData Definitions, Audiences, Journeys, Rules and models from your Orchestrator. Call setup() on every launch — the SDK only fetches optimised deltas.
Run your app and confirm the SDK reports a successful setup (in debug mode you'll see logs in the device console). With the SDK ready, the rest of this guide is in the Orchestrator UI.
Step 2: Define the favorite_color MeData
A MeData Definition describes one data point you want the SDK to collect on-device — its name, source, value type and constraints. The SDK fetches every Definition you publish on the Orchestrator and uses it to know how to collect and store values.
We'll create a Question-sourced MeData called favorite_color. Question-sourced MeData is the simplest source: when the SDK needs to collect it, it shows the question you authored and stores the user's answer.
- From the Orchestrator's left navigation, open MeData Definitions.
- Click the + button on the top-right of the MeData Definitions table.
- Fill in the editor:
- Source:
Question - Programmatic name:
favorite_color - Display name:
Favourite colour - Description:
The user's favourite colour, asked once. - Sharable:
true(you'll be able to request it as Zero-Party Data later) - Value Type:
string - Provide the question text shown to the user, e.g. "What is your favourite colour?"
- Source:
- Save the Definition.
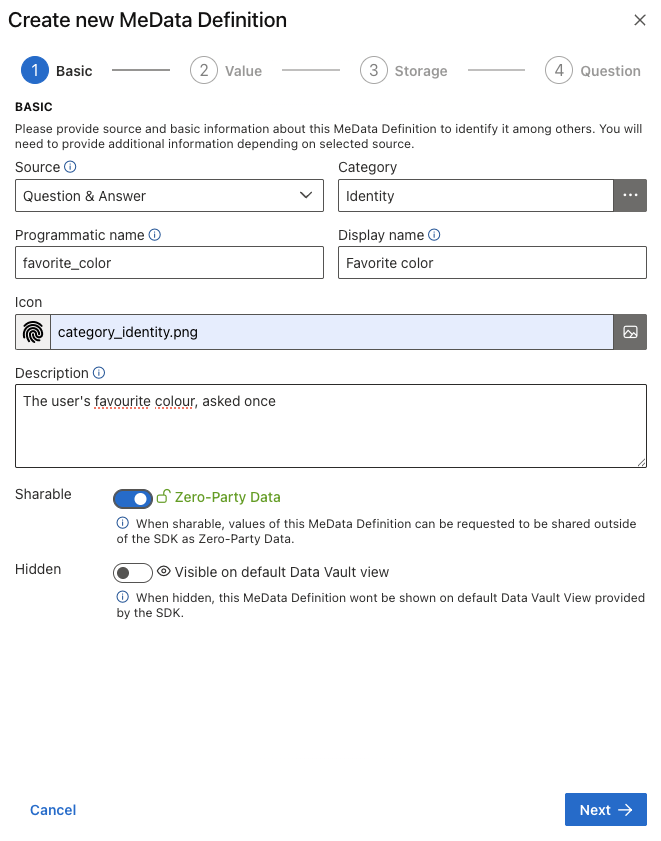
[#02] The MeData Definition editor with favorite_color
The new Definition appears in the table. The SDK will pick it up on its next sync.
A MeData Definition's Source can also be Native (device/OS data), Script (logic you author) or VC (Verifiable Credentials). We're keeping it simple here.
Step 3: Build the Journey
A Journey is a flow of steps that the SDK runs on the device. Each step reads from and writes to the JourneyContext — a per-execution variable bag — so later steps can use what earlier steps produced.
3.1 Create a draft
- Open Journeys in the Orchestrator.
- Click + to start a new Journey. The Journey Editor opens on the Basics and Audience section.
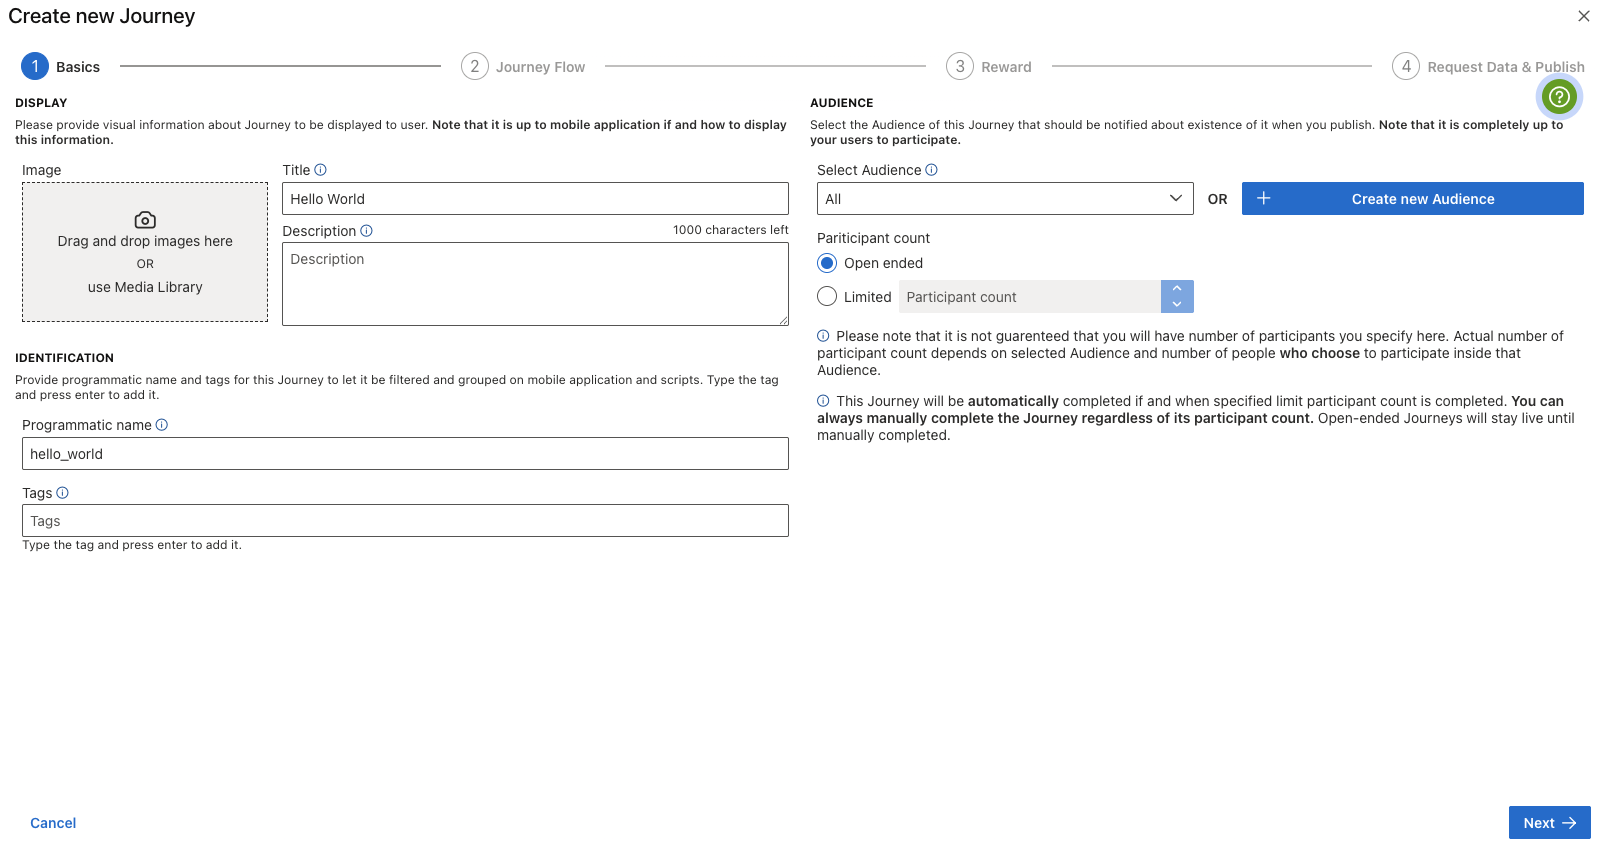
[#03] Journey Editor — Basics and Audience
- Fill in:
- Title:
Hello World - Programmatic name:
hello_world(this is the unique identifier your host app will use — see Step 5). - Description:
A first DataSapien journey that greets the user. - Tags: add a tag like
getting-startedso your app can filter for it. - Target Audience: select the built-in All Audience. (More on Audiences later.)
- Leave participants as Open-ended.
- Title:
3.2 Design the flow
Move to the Journey Flow section. You'll use the Flow Designer to drag five steps onto the canvas and connect them.
The flow is:
Start → MeData step → Question step → Script step → Screen step → End
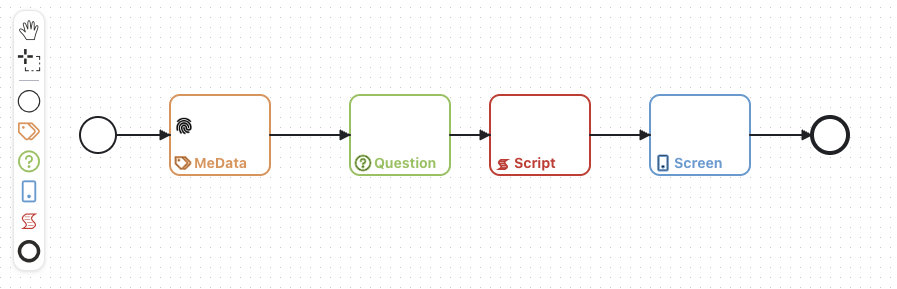
[#04] The five-step Hello World flow on the canvas
MeData step — collect favorite_color
Drag a MeData step between Start and the next step. Double-click it to open the MeData Usage Editor and select your favorite_color Definition.
When this step runs, the SDK shows the question you authored on the MeData Definition, stores the answer in the on-device data vault, and puts it into the JourneyContext under the key favorite_color.
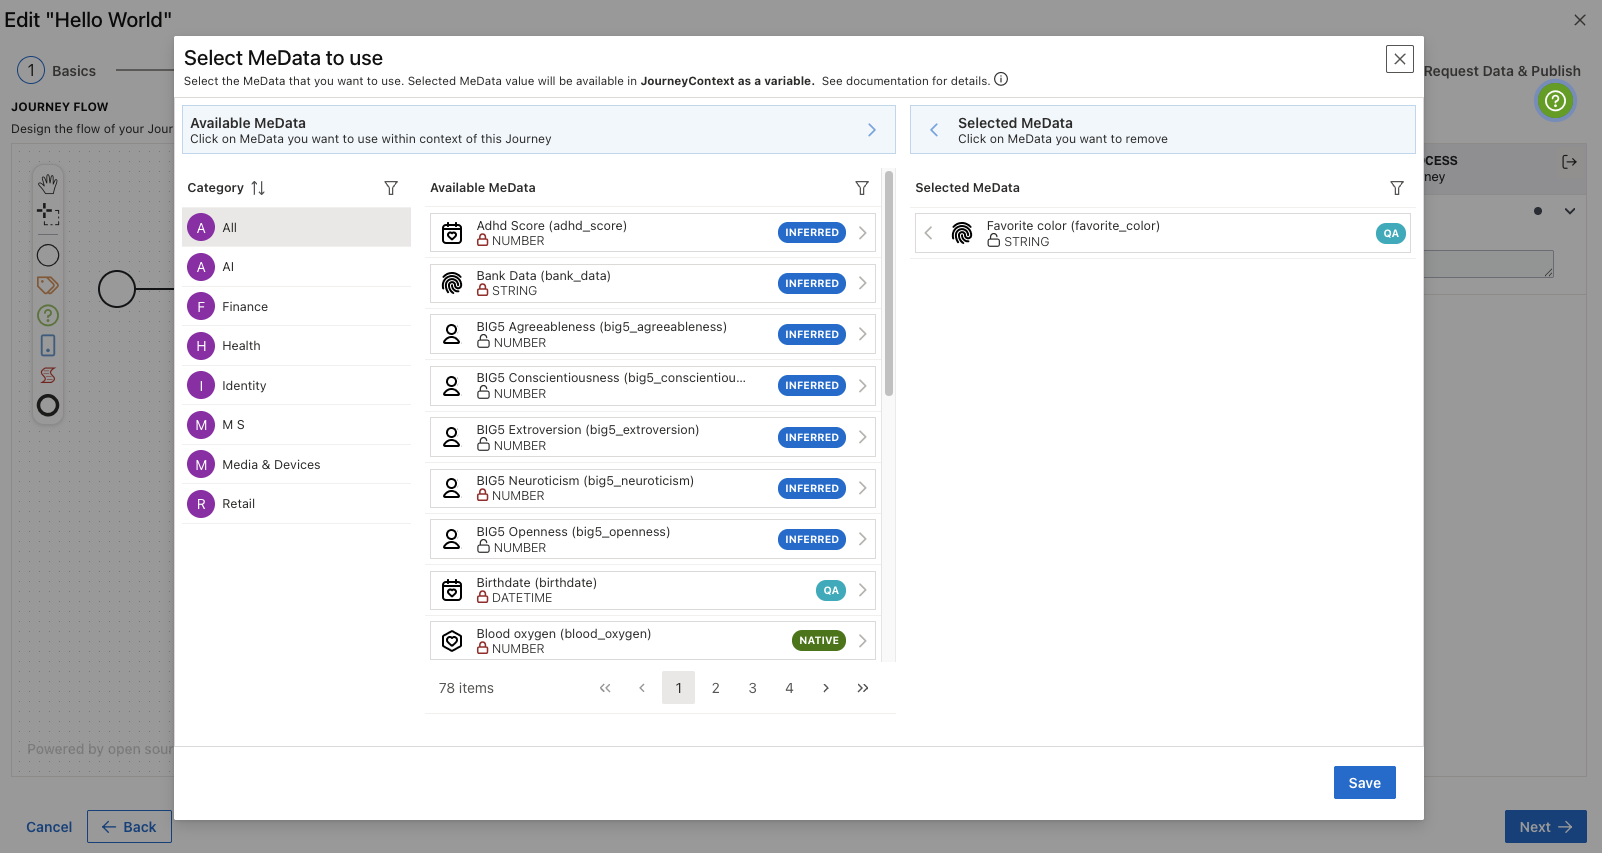
[#05] Selecting favorite_color in the MeData Usage Editor
Question step — ask for the user's name
Drag a Question step next. Double-click it to open the Question Editor and configure:
- Question text: "What's your name?"
- Free-form answer (no predefined choices), single answer.
- JourneyContext variable:
user_name.
After this step runs, user_name is available in the JourneyContext.
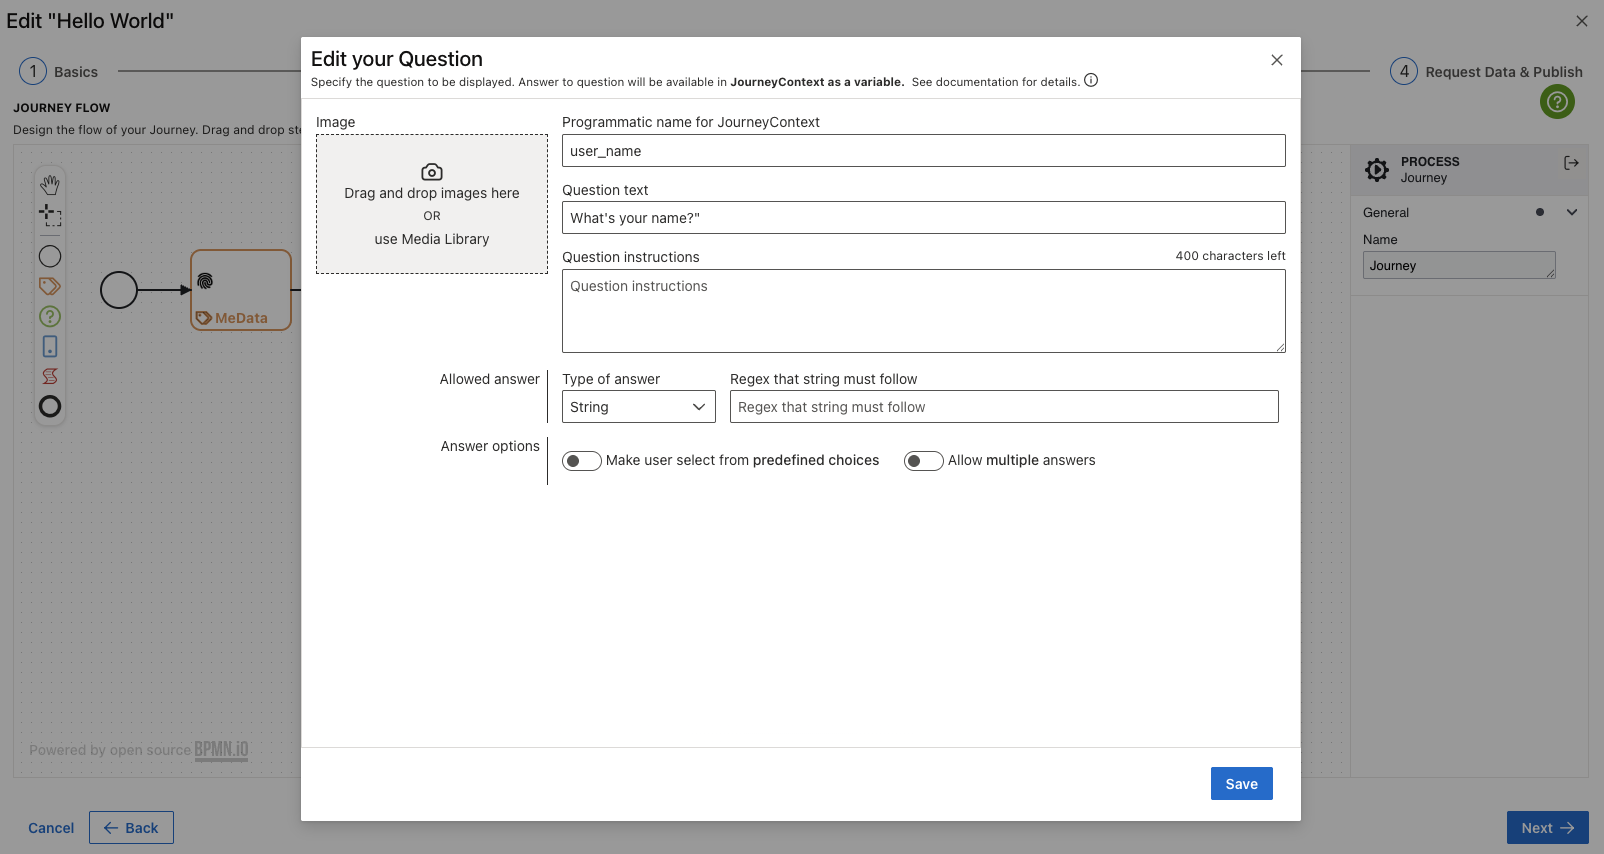
[#06] The Question Editor configured with "What's your name?"
Script step — compose the greeting
Drag a Script step next. Double-click to open the Script Editor and paste:
// Read values that earlier steps put into the JourneyContext.
const userName       = JourneyContext.getValue("user_name");
const favoriteColor  = JourneyContext.getValue("favorite_color");

// Compose the greeting and write it back to the JourneyContext.
const greeting = `Hello, ${userName}! Your favourite colour is ${favoriteColor}.`;
JourneyContext.putValue("greeting", greeting);

// Tell the SDK the script finished successfully and the Journey can advance.
onSuccess(true);
JourneyContext.getValue("name")reads a value an earlier step wrote.JourneyContext.putValue("name", value)writes a value for later steps to read.- A Script step must end by calling
onSuccess(true)to advance, oronSuccess(false)to signal failure. There is noreturnvalue used by the SDK. async/awaitis supported — wrap external work intry/catchand callonSuccess(false)fromcatch.
Script steps run in the SDK's embedded JavaScript engine. They can read MeData via the MeDataService, invoke ML/AI models via the IntelligenceService, and call external APIs via Managed APIs. See Scripts and Managed APIs for the full picture.
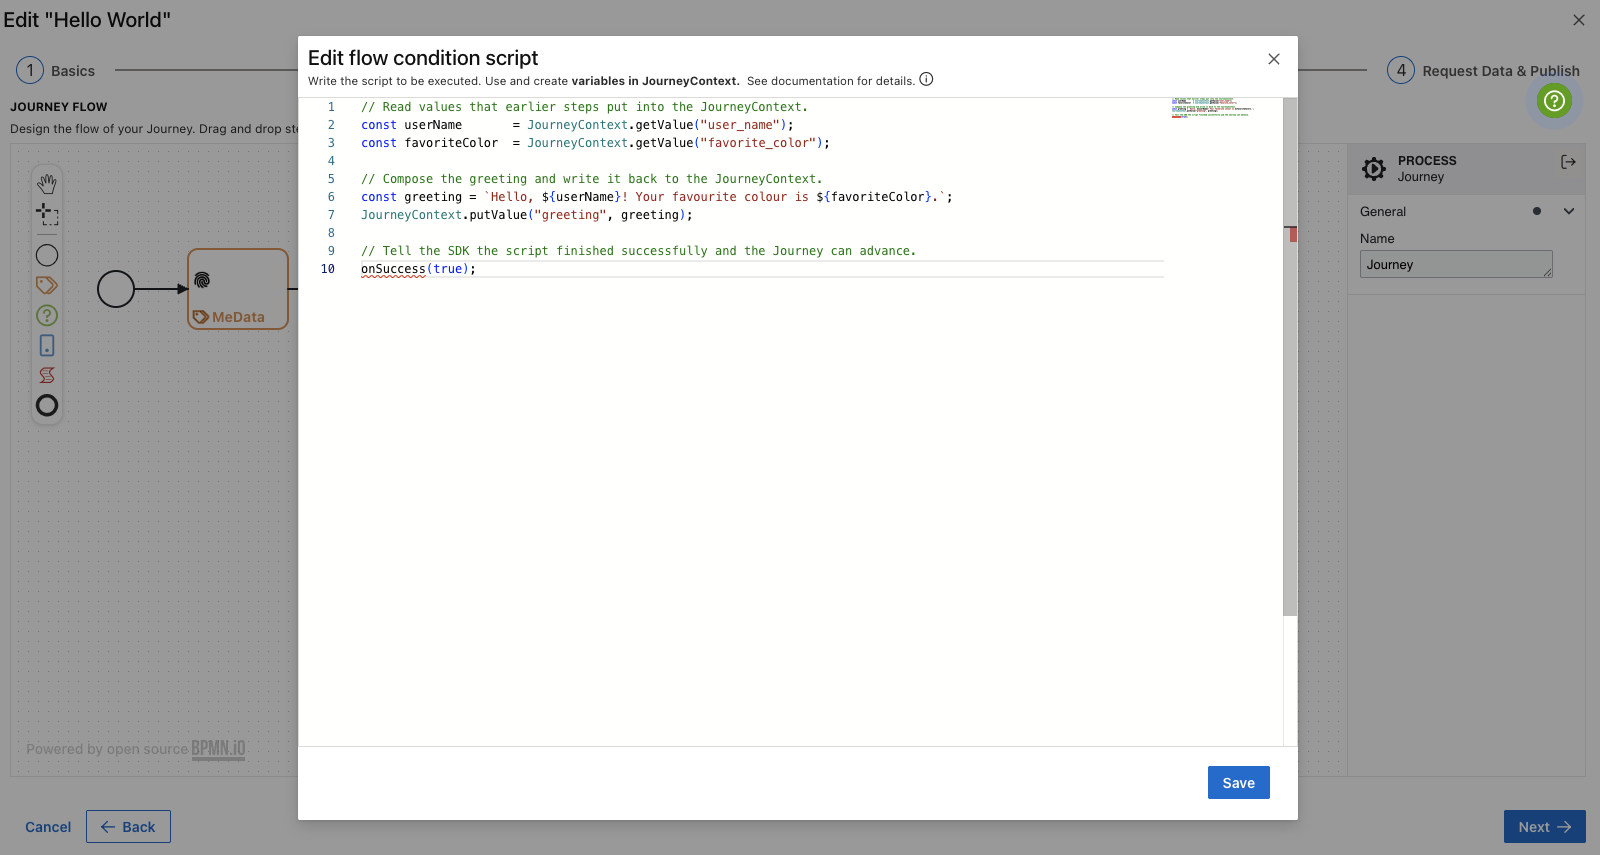
[#07] The Script Editor composing the greeting
Screen step — display the greeting
Drag a Screen step before the End step. Double-click to open the Screen Designer and:
- Drop a Text (or Rich Text) component onto the canvas.
- Set its content to
{{greeting}}. The{{...}}syntax embeds a JourneyContext variable. - Drop a Button component, label it
Done, and wire it to advance the Journey.
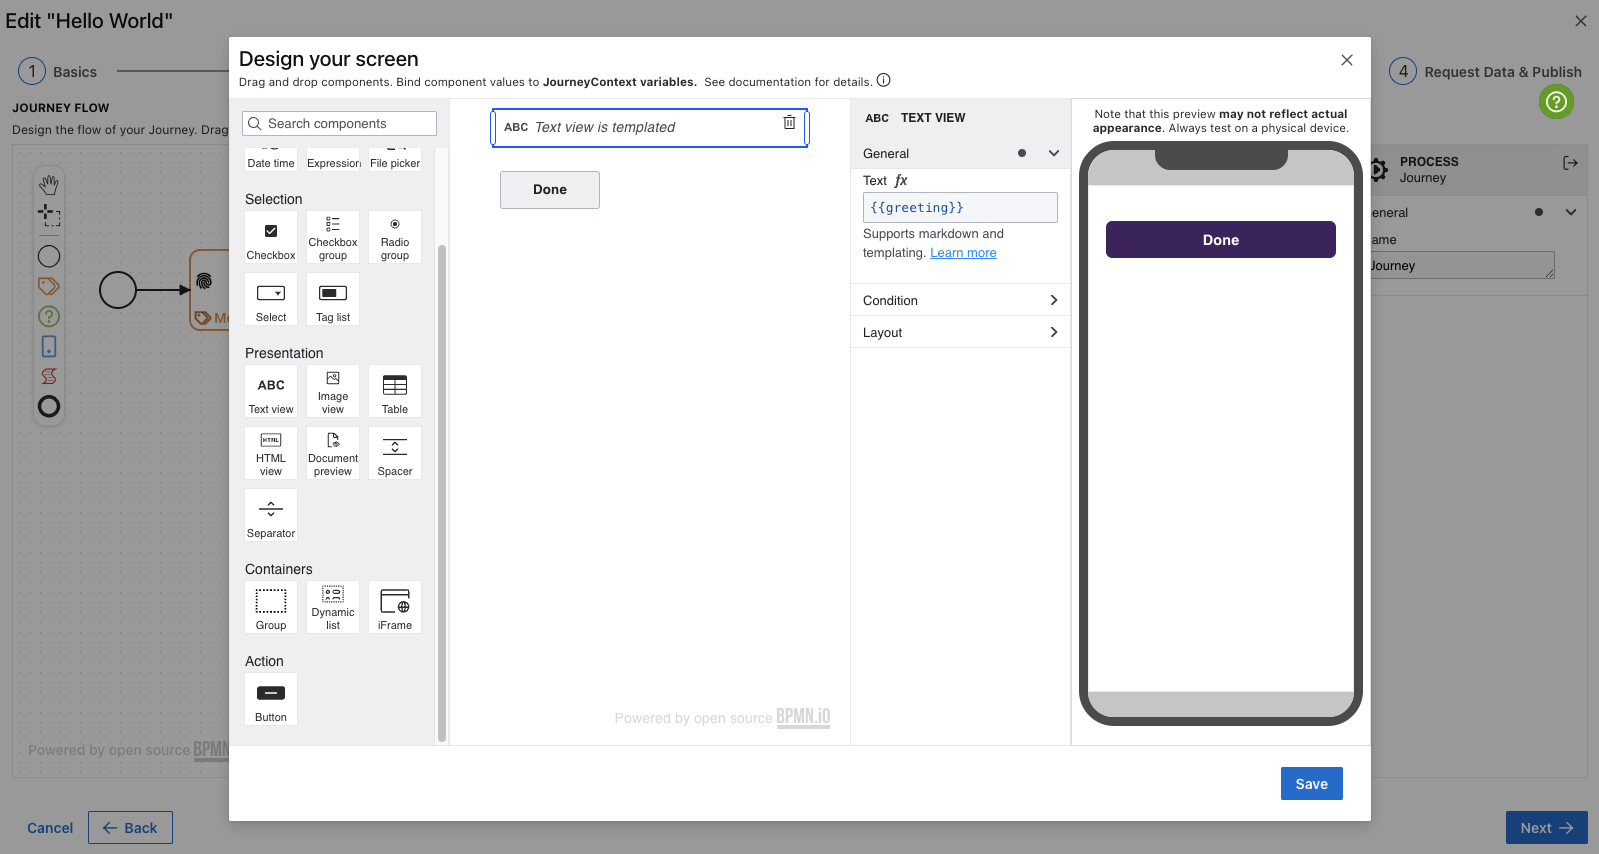
[#08] Screen Designer displaying the composed greeting
Connect Start → MeData → Question → Script → Screen → End. Save the draft.
3.3 Skip rewards and ZPD
For this first Journey, leave Rewards off and don't request any Zero-Party Data. You can come back and turn either on later.
Step 4: Publish
In the final section of the editor, review the summary and click Publish.
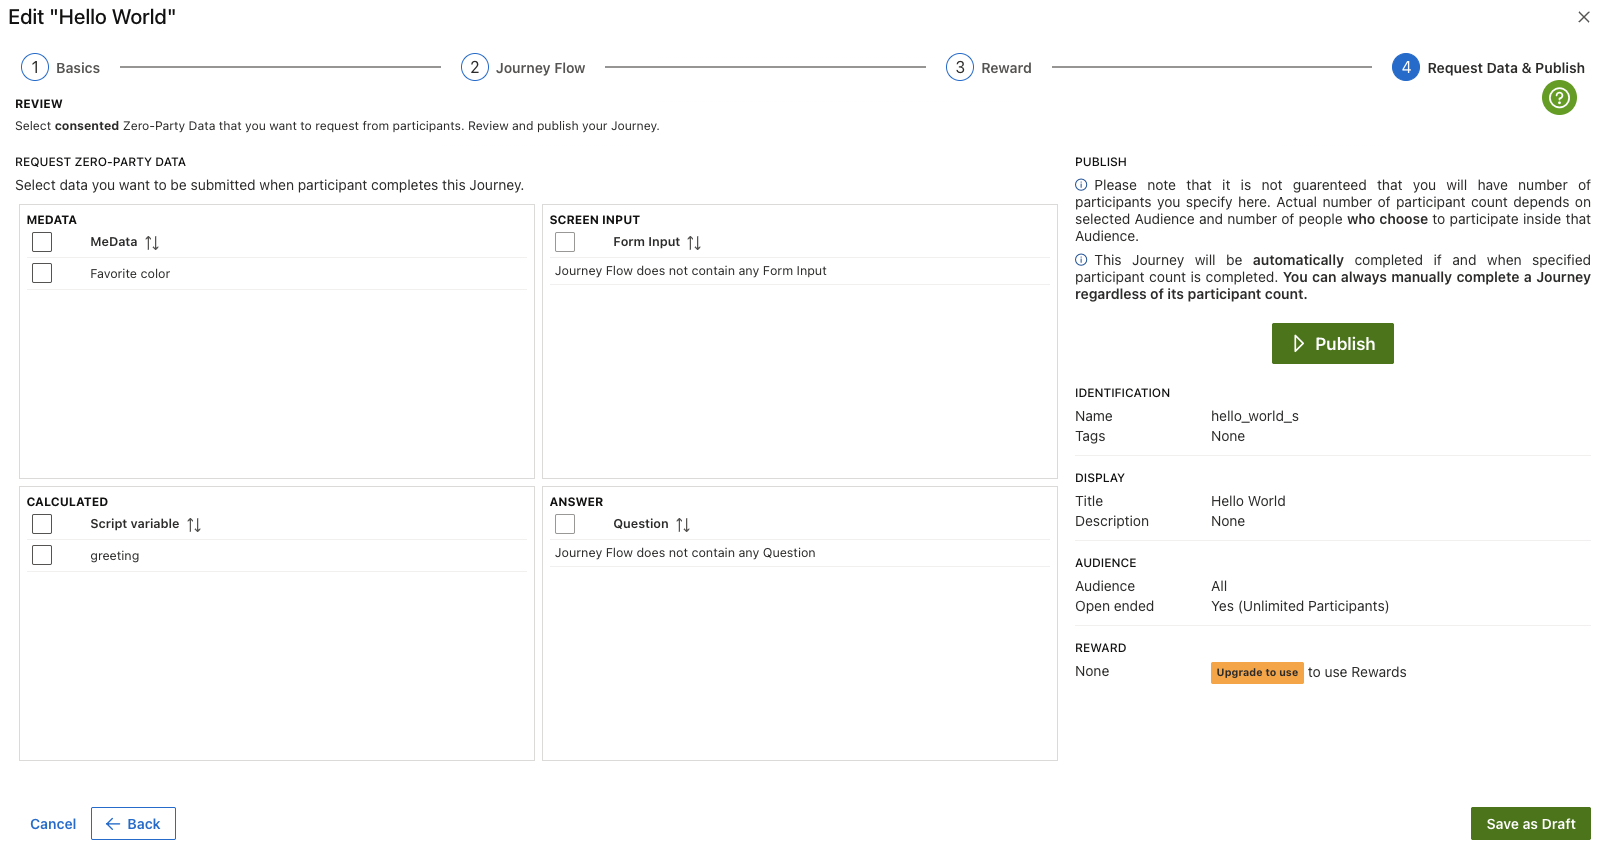
[#09] Publishing the Hello World Journey
The Mobile Backend now makes the Journey available to every Mobile SDK instance whose Audience matches All, which is all of them.
Step 5: Run the Journey from your app
Your host app reaches Journeys through the JourneyService. The recommended path is SDK-provided UI: the SDK renders the Journey's screens itself in a styleable WebView, so your app only needs to fetch the Journey by name and run it.
The two functions you need are:
JourneyService.getJourneys(tags?, statuses?)— list available Journeys, optionally filtered by tag.JourneyService.runJourney(name, data)— run a Journey by its programmatic name.datais an object whose keys are seeded into the JourneyContext before the first step.
- iOS
- Android
- Flutter
- React Native
let journeyService = DataSapien.getJourneyService()

// Either look it up by tag…
let journeys = try await journeyService.getJourneys(tags: ["getting-started"])

// …or just run it directly by programmatic name.
let result = try await journeyService.runJourney(
    name: "hello_world",
    data: [:]
)
val journeyService = DataSapien.getJourneyService()

lifecycleScope.launch {
    // Either look it up by tag…
    val journeys = journeyService.getJourneys(tags = listOf("getting-started"))

    // …or just run it directly by programmatic name.
    val result = journeyService.runJourney(
        name = "hello_world",
        data = emptyMap()
    )
}
final journeyService = DataSapien.getJourneyService();

// Either look it up by tag…
final journeys = await journeyService.getJourneys(tags: ['getting-started']);

// …or just run it directly by programmatic name.
final result = await journeyService.runJourney(
  name: 'hello_world',
  data: {},
);
const journeyService = DataSapien.getJourneyService();

// Either look it up by tag…
const journeys = await journeyService.getJourneys(['getting-started']);

// …or just run it directly by programmatic name.
const result = await journeyService.runJourney('hello_world', {});
A Journey's programmatic name is the unique identifier you set on the Basics section in Step 3.1 (we used hello_world). It's what every API call refers to — not the display title.
The native API surface is nearly identical to the JavaScript one shown above; Android methods may take an extra Context. See the JourneyService API reference for per-platform signatures.
Build and run your app on a device. Trigger the call above and the SDK will, in order:
- Show the
favorite_colorquestion. - Show the "What's your name?" question.
- Run the Script step silently to build
greeting. - Show the Screen displaying
Hello, <name>! Your favourite colour is <colour>. - Complete.
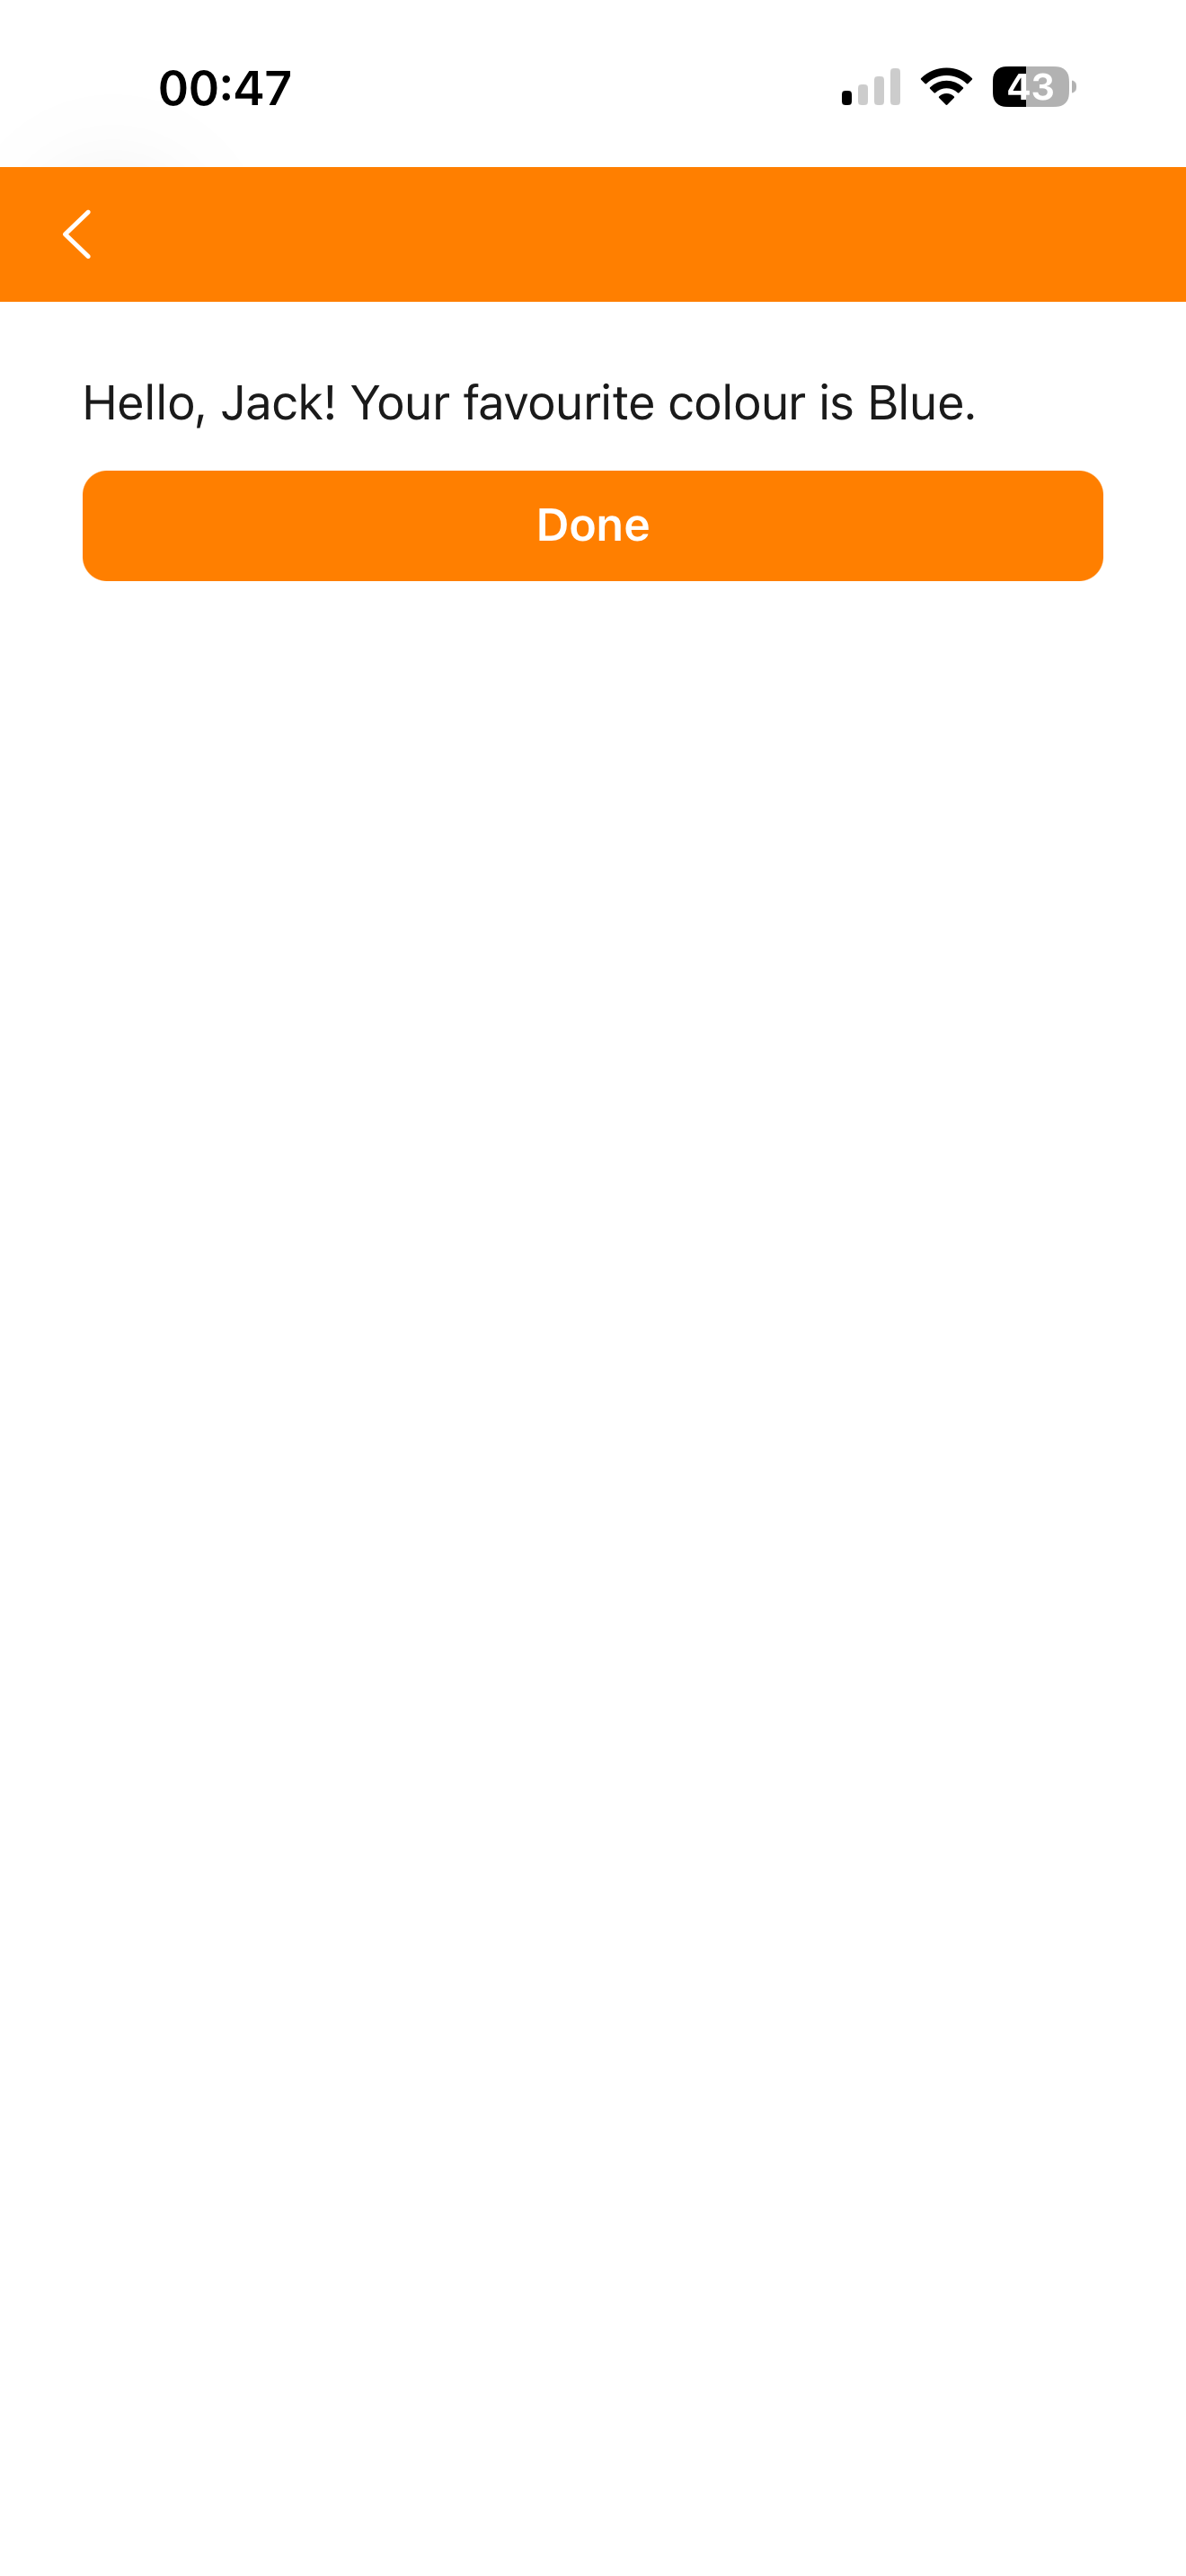
[#10] The Hello World Journey running on a device
What just happened
In a single Journey you used four of the five step types, defined a custom MeData, persisted a value to the on-device data vault, and ran user-authored logic — all without sending any personal data to a backend. That's the whole platform in miniature.
Next steps
- Request the collected
favorite_coloras Zero-Party Data and watch it appear in the Journey Viewer after a run. - Add a Conditional Flow that branches on the colour the user picked.
- Replace the static greeting with one generated by an on-device AI model called from the Script step.
- Restrict the Journey to a real Audience instead of All.